Growing Rudbeckia For Cutting
A plant profile for cutting gardens and seasonal bouquets
Why Grow Rudbeckia?
Rudbeckia, commonly known as Black-eyed Susan, is a cutting garden favorite for its bold blooms, long flowering season, and exceptional heat tolerance. With varieties such as Sahara, Irish Eyes, and Indian Summer, Rudbeckia offers a rich palette of warm, earthy tones that are especially valuable for summer and early fall bouquets.
It thrives in heat, performs reliably in challenging conditions, and is easy to grow from seed. In our South Carolina climate, it earns its place as both a hardworking garden plant and a dependable bouquet flower.
Recent breeding work has expanded the color range and flower forms available, particularly within the Sahara series, giving growers more design flexibility without sacrificing performance.
Selecting the Right Varieties
If you plan to use Rudbeckia in arrangements, variety selection matters. Taller cultivars with strong stems are best suited for cutting, while shorter forms may be better reserved for garden color.
When choosing varieties, consider:
Mature plant height - growing stems that are least 16 inches tall will provide optimal flexibility in arrangements
Flower form (single, semi-double, double)
Color palette and how it fits into your bouquets
Best Rudbeckia Varieties for Cutting Gardens
Rudbeckia hirta ‘Cherokee Sunset’
Double to semi-double blooms in warm sunset tones; strong stems and excellent heat tolerance.
Height: 20–22 inchesRudbeckia hirta ‘Cherry Brandy’
Deep burgundy petals that add dramatic contrast to mixed bouquets.
Height: 22–24 inchesRudbeckia hirta ‘Double Gloriosa’
Classic golden-yellow, double flowers with a traditional Black-eyed Susan look.
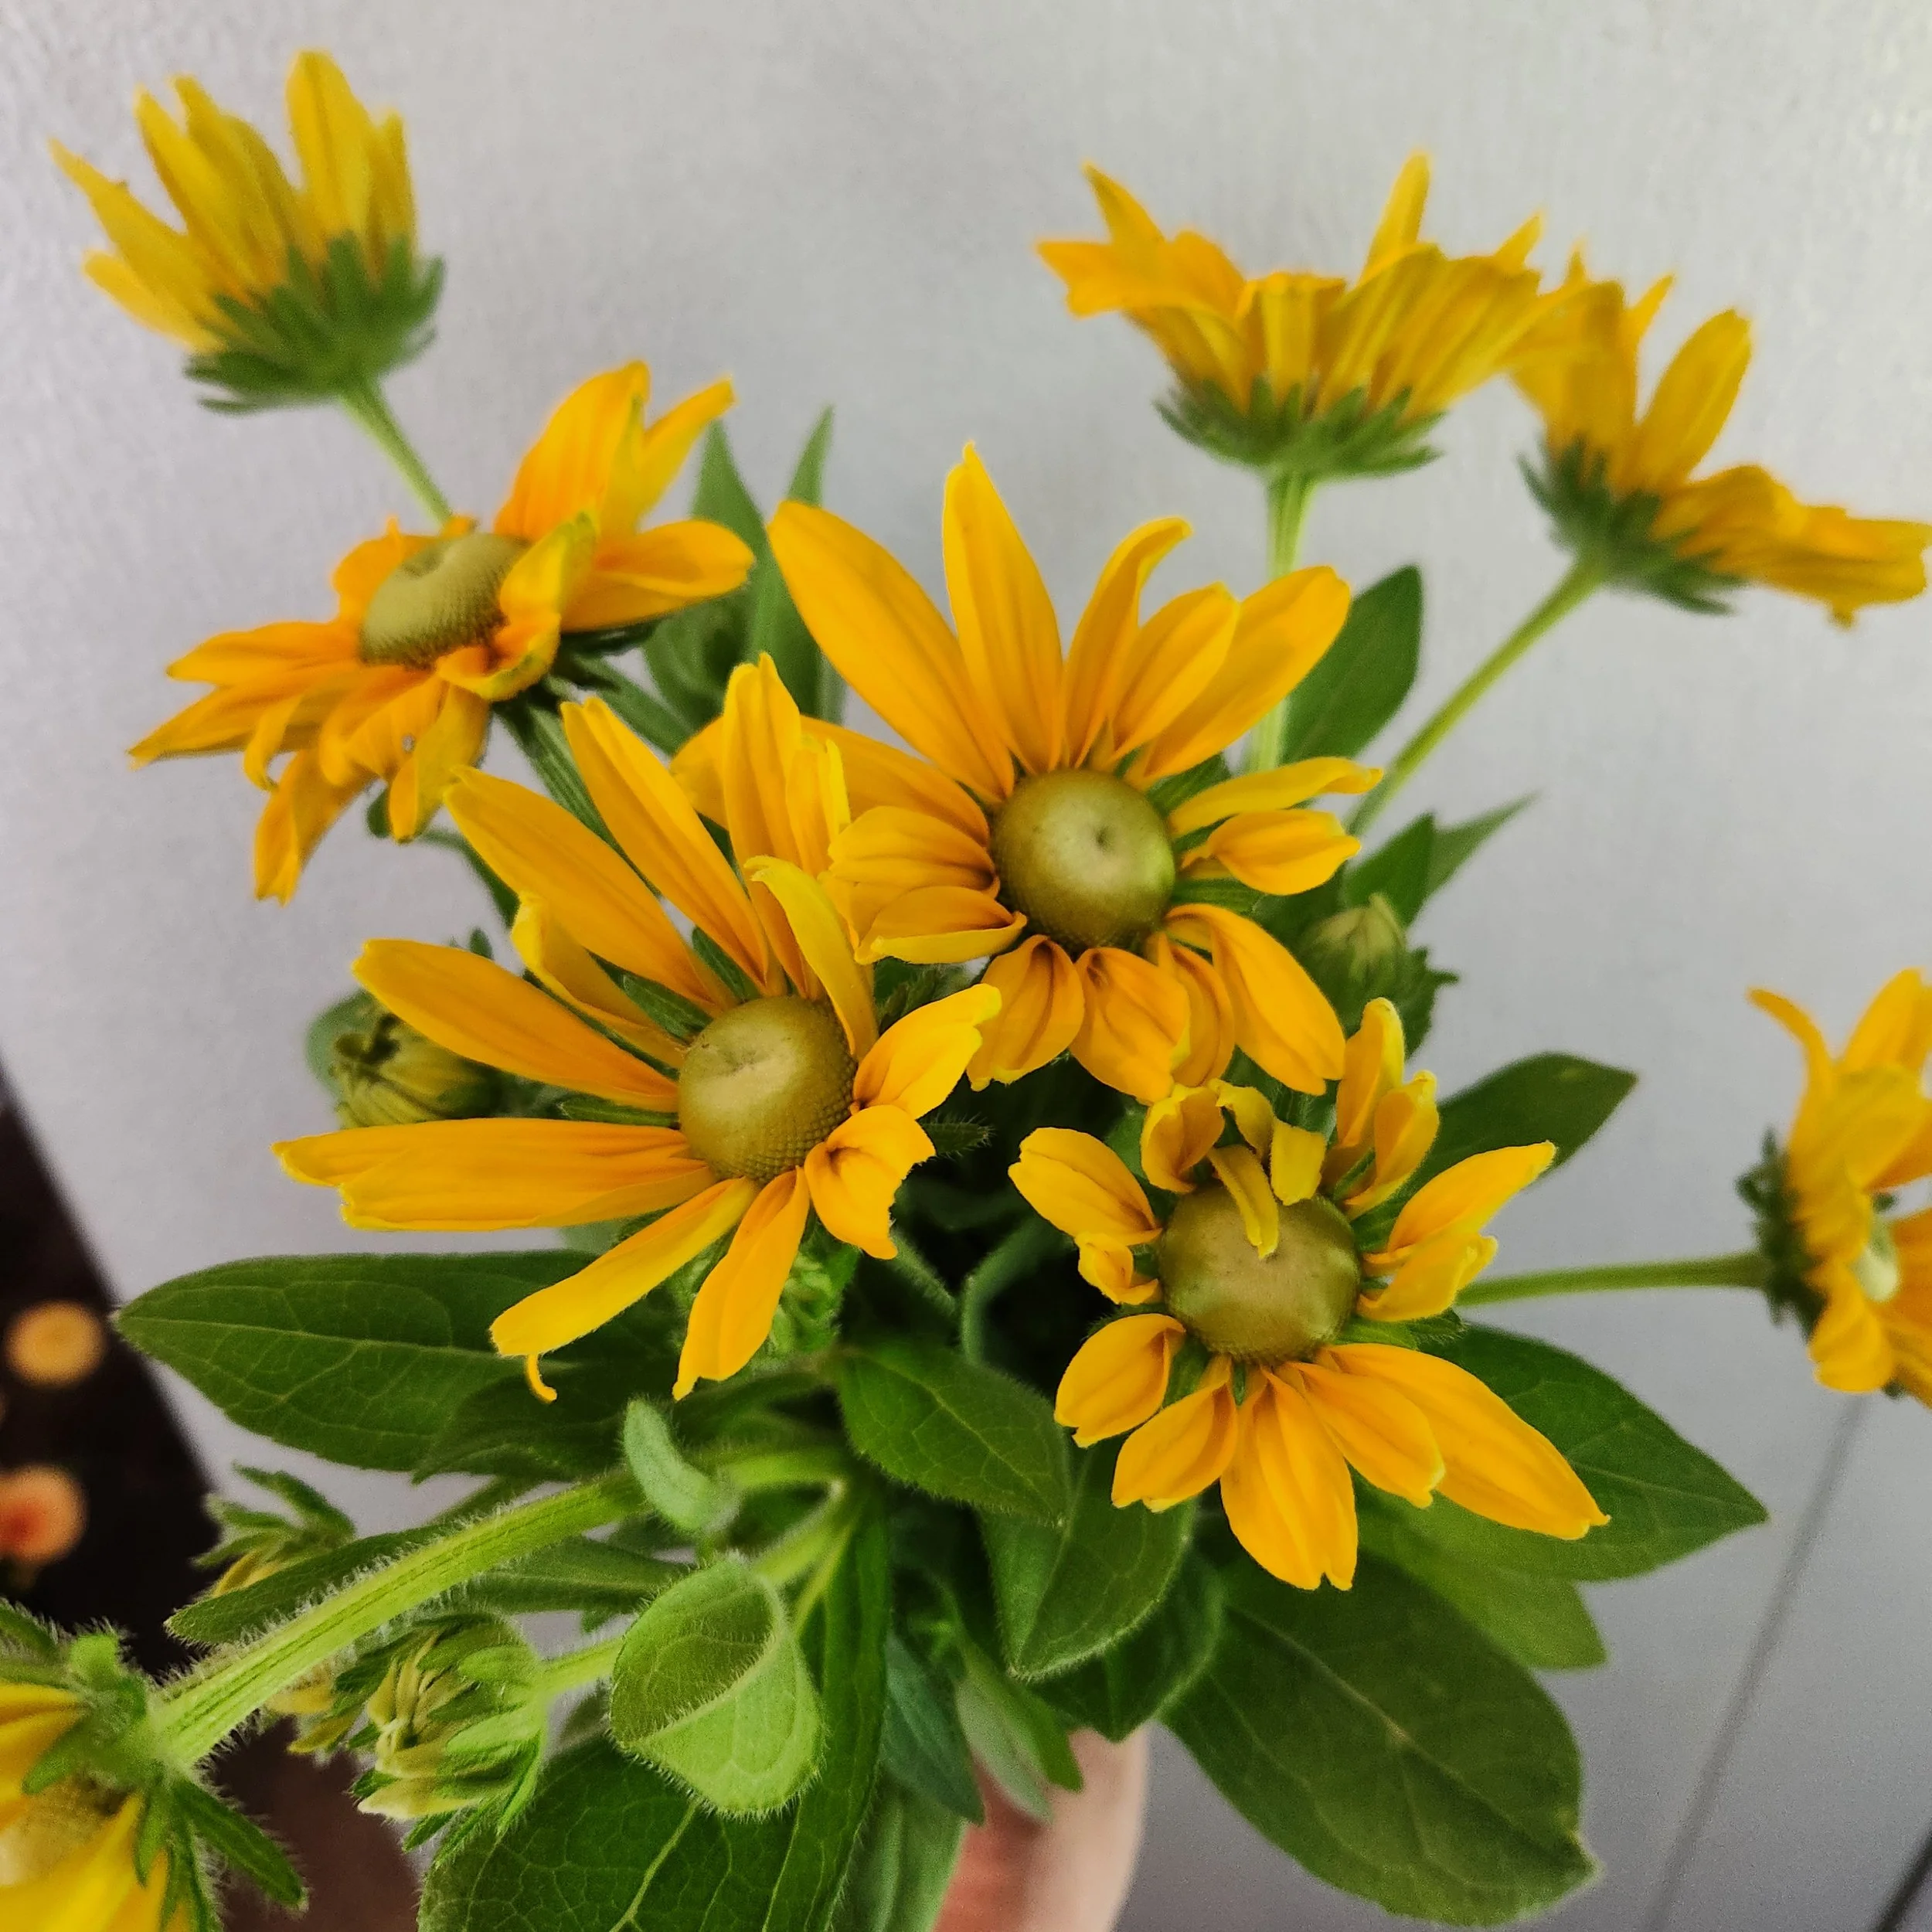
Height: 24–27 inchesRudbeckia hirta ‘Prairie Sun’
Golden-yellow petals with lime-green centers; bright, cheerful color and sturdy stems.
Height: 28–32 inchesRudbeckia hirta ‘Irish Eyes’
Chartreuse-toned petals with a distinctive green eye; striking and unusual in arrangements.
Height: 36–42 inchesRudbeckia hirta ‘Indian Summer’
Large golden blooms on tall stems; excellent for mass planting and cutting.
Height: 36–42 inchesRudbeckia hirta ‘Sahara’
Unique warm tones including rose, apricot, and bronze; semi-double to double blooms.
Height: 20–22 inchesRudbeckia triloba
Tall, branching sprays of smaller golden blooms; outstanding as a late-season filler flower.
Height: 48–60 inches
Note: Rudbeckia fulgida ‘Goldsturm’ is an excellent landscape plant but has a very short vase life and is not recommended for cutting gardens.
How to Grow Rudbeckia (Zone 8b)
Sunlight
Rudbeckia prefers full sun, with at least six hours of direct light daily.
Soil
Grows best in well-draining, moderately fertile soil. It tolerates a range of pH levels but performs best between 6.0 and 7.0.
Water
Water regularly until plants are established. Once mature, Rudbeckia is drought-tolerant and well suited to hot summers.
Spacing & Air Circulation
Space plants 12–18 inches apart to reduce fungal issues and improve airflow.
Planting Methods
Direct Sowing
Seeds can be sown outdoors in fall or early spring when temperatures are cooler. In our climate, some Rudbeckia may behave as short-lived perennials, but for best results, fresh plants are recommended each year. Allowing plants to go to seed can provide volunteers for future seasons.
Starting Indoors
Start seeds indoors 6–8 weeks before the last frost date. Transplant outdoors once the danger of frost has passed. Seeds require light to germinate, so press them into the soil surface without covering.
Maintenance for Optimal Flower Production
Pinching & Pruning
Pinch young plants once they have four or more sets of leaves by removing the top two sets. This encourages lateral branching and increases stem production. Deadhead spent blooms regularly to encourage continued flowering.
Fertilization
Apply a balanced, slow-release fertilizer at planting. Rudbeckia is not a heavy feeder; excessive nitrogen can lead to aphid problems.
Pest & Disease Management
In humid conditions, watch for powdery mildew and leaf spot. Water at the base of the plant and maintain good airflow.
Harvesting and Using in Bouquets
When to Cut
Harvest flowers when blooms are fully open and firm to the touch.
How to Cut
Use sharp pruners and cut stems at a 45-degree angle. Place stems immediately into cool water.
Post-Harvest Care
Remove foliage below the water line and change vase water every 2–3 days.
Vase Life
Expect a vase life of approximately 7–10 days.
Extending the Bloom Season
Rudbeckia responds well to succession sowing during cooler parts of the year. Start seeds in fall, then sow again once or twice between late February and early April. Each planting can bloom for a month or more.
Later sowings may bloom before extreme heat arrives or pause during summer and resume flowering in fall. The key is establishing strong plants before high temperatures set in.
Companion Plants for Bouquets
Rudbeckia pairs beautifully with:
Cosmos for height and movement
Celosia for texture and color
Zinnias for similar bloom timing
Eucalyptus or basil for fragrant greenery
Seed Sources
Reliable seed sources include:
Johnny’s Selected Seeds
Swallowtail Garden Seeds
Park Seed
When selecting varieties, check mature plant height. For cutting gardens, 16 inches is the minimum stem length that works well.
What to Expect
Rudbeckia is a heat-loving, low-maintenance powerhouse. Its long bloom period, expanding color range, and reliability make it one of the most dependable flowers for summer cutting gardens and seasonal bouquets.
A Simple Guide to Growing Amaryllis
Indoors in winter, outdoors in the garden and year after year
Amaryllis are treasured for their ability to produce large, vibrant flowers indoors during the coldest months of winter. Their low-maintenance care and potential for reblooming make them a favorite among indoor gardeners. Follow this guide to enjoy the beauty of amaryllis year after year indoors, or to transition them outdoors to enjoy in your garden here in Columbia.
Amaryllis Cape Horn
Choosing Your Amaryllis Bulbs
Look for firm, unblemished bulbs, similar to how you would choose an onion. Larger bulbs produce more stems and flowers. For a more impressive display, choose the largest bulbs you can find. The flowers are already formed in the bulb when you receive them, so larger bulbs will have more and larger flowers.
While red and white varieties are the most common, amaryllis is also available in shades of pink, burgundy, orange, yellow, and even green.
Select bulbs from the southern hemisphere (sometimes referred to as “Christmas Blooming”) if you want them to bloom for the holidays, or as fast as possible (4-6 weeks). Bulbs from the northern hemisphere (sometimes called “shelf stable”) will bloom after the holidays, since they are going to take longer to acclimate to the warmth of your home. Typically, these take 6-10 weeks to bloom and are wonderful to have in bloom in January and February,
How to Grow Amaryllis Indoors
Preparing Your Amaryllis Bulb
Wake the Bulb: Soak the roots in warm water for about an hour, then allow them to drain completely.
Planting: Use well-draining potting soil and pot the bulb, leaving about one-third of the bulb above the soil surface.
Initial Watering: Thoroughly soak the soil with warm water after planting, then refrain from watering until green shoots appear.
Placement: Keep the pot in a warm, dark spot (70-75°F) for two weeks to encourage root development.
Pro Tip: If your bulb has already started sprouting, don’t worry. The stem will naturally straighten as it grows.
Encouraging Blooms
Move to Light: Once roots are established, place the pot in a bright, warm location (70-80°F). A sunny windowsill or a spot near a heat source works well.
Watering: Water only when the top inch of soil feels dry. Avoid overwatering, as this can lead to bulb rot.
Patience is Key: Growth may take several weeks. Keep the pot warm and avoid excessive watering.
Rotate for Even Growth: When the stem begins to emerge, rotate the pot daily to ensure the stalk grows straight.
Caring During the Bloom period
Prolong Blooms: Once the flowers open, move the pot out of direct sunlight to extend bloom time.
Deadhead Regularly: Remove fading flowers by cutting them near the base of the stalk. This can encourage additional blooms.
Trim Spent Stalks: After all flowers have faded, cut the stem back to about 2 inches above the bulb. Leave green leaves intact to nourish the bulb for next season.
How to Save Amaryllis Bulbs for Reblooming Indoors
Post-Bloom Care: Place the pot in a bright location and continue watering when the top inch of soil feels dry. Fertilize monthly.
Summer Outdoors: Two weeks after the last frost (mid-April in Columbia), move the pot outside to a sunny or partially shaded area to promote leaf growth and strengthen the bulb.
Fall Dormancy Preparation:
In early fall, cut the foliage just above the bulb.
Bring the pot indoors and place it in a cool, dark location (50-60°F) for 8-10 weeks.
Do not water during the dormancy period.
Restart Growth: After the dormancy period, follow the initial growth steps to encourage blooming once again.
Note: Amaryllis bulbs thrive when slightly pot-bound. Repotting every year is not necessary, allowing for easy long-term care.
By following these steps, you can enjoy beautiful amaryllis blooms during the winter months and cultivate healthy bulbs that rebloom season after season.
Growing Amaryllis Outdoors
Amaryllis also makes an excellent garden plant and is cold hardy in South Carolina through USDA planting Zone 8. This means Amaryllis grown indoors during the holiday season can be moved outdoors in the spring after the threat of frost has passed, generally around mid-April. Gradually acclimate the indoor plants to brighter light by moving them to a porch or patio area before planting them in the garden.

find the right location
Amaryllis, like all bulbs, need soil that drains well. A raised bed may be necessary to ensure good drainage if your soil has a lot of clay in it. A soil rich in organic matter will provide the best growth, so add compost if your soil is lean like ours. Plant bulbs directly into the ground, spaced about a foot apart. Plant with half the bulb tip above ground, leaving the tops barely covered with soil.
Select a sunny spot in the garden that receives afternoon shade. Avoid placing the bulb where it will dry out excessively. Apply mulch, especially during the fall and winter months. Leaves work well for this.
Fertilize
Fertilization determines the size and quality of the flowers and foliage. For garden plantings, fertilizers containing low nitrogen, such as 5-10-10 or 6-12-12 analysis should be used. Use quantities as defined on the fertilizer bag. Make the first fertilizer application as new growth begins, then repeat the application when the flower stalk is 6 to 8 inches tall, before blooming. Do not feed while the plant is in bloom. Apply a third application immediately after flowering. Remove spend stalks/blooms but keep the leaves on the plant.
Amaryllis grown outdoors are deer resistant. They will grow lush foliage outdoors over the summer, storing energy for future blooms.
A Versatile Bloom for Every Season
Whether you’re decorating your home for winter, planning thoughtful gifts, or adding beauty to your garden, amaryllis is a wonderful choice. With its vibrant colors and easy care, it’s a simple way to brighten any space.
We carry amaryllis bulbs each year starting in early November. Their arrival will be announced in our newsletter, Farm Dirt.
Amaryllis and Paperwhites: Easy Indoor Blooms for the Winter Season
I recently gave a talk to a garden club about growing amaryllis and paperwhites and was surprised to learn that many of the members had never tried growing these delightful bulbs. Both are easy to grow and offer a welcome indoor floral display when it’s too cold for outdoor blooms.
Amaryllis: Your Winter Weather Showstopper
Amaryllis bulbs take about 6–8 weeks to bloom, depending on the variety. To get started:
Pot them up and place them in a low-light location for the first week to 10 days. This helps their roots establish.
Once the stems begin to emerge, move them to a warm spot with indirect light
Turn the pot occasionally to keep the stems growing straight.
Did you know? Each amaryllis bulb already contains the flowers that will emerge—this is why bulb size matters. Larger bulbs produce more stems and more flowers per stem, creating a more dramatic display.
Amaryllis bulbs also make fantastic gifts! They remain dormant until potted and watered. One holiday season, I gifted amaryllis forcing kits to friends. Watching them share pictures of their blooms was so rewarding—it’s a gift that keeps giving long after the holidays.

Paperwhites: Quick and Elegant
For those seeking quicker blooms, paperwhites are the instant-gratification bulbs of the season, blooming in just 3–5 weeks. If you start now, you could even have blooms for Christmas! As with amaryllis, larger paperwhite bulbs mean more abundant flowers.
Most commonly, you’ll find the variety ‘Ziva’ in stores, known for its strong scent. However, newer varieties with milder fragrances and even touches of color are becoming popular.
A bonus: After the holidays, if your paperwhites were grown in potting soil, you can plant them in your garden. Add compost and a little bone meal to the soil, and you can enjoy their blooms for years to come here in Columbia.
Tips for Long-Lasting Blooms
Keep blooms cooler and away from direct sunlight to prolong their beauty.
Avoid high temperatures, which can cause stems to grow too long and fall over. If this happens, cut the stem at its base and display the flower in a vase—it makes a gorgeous cut flower!

A Fun Cornell Trick: Blooms on “The Rocks”
A study from Cornell University found that using alcohol—yes, gin, vodka, or tequila—helps keep stems of both amaryllis and paperwhites shorter and sturdier. Here’s how:
Mix one part alcohol to seven parts water.
Use this mixture for weekly watering once the stems start to grow.
Avoid beer or wine (too much sugar!) and keep the solution mild—too much alcohol is toxic (we knew that, didn’t we?).
Tip: Rubbing alcohol works just as well if you don’t have liquor on hand.
Local Holiday Bulbs
This weekend, we’ll have amaryllis and paperwhite bulbs available for sale at the Dolce Vita Farms Open House:
📍 1715 Congress Rd, Eastover, SC 29044
🕚 Hours: 11 AM – 3 PM on Saturday, December 7, 2024.
Amaryllis bulbs started now won’t bloom for Christmas, but they’re a joy to experience after the holidays.
If you’re looking for something blooming in time for Christmas, stop by Cottage and Vine:
📍 4619 Forest Drive - Suite 2, Columbia, SC 29206
🕙 Hours: M–F 10 AM–5:30 PM | Sat 10 AM–4 PM
📞 803.550.9409 | 🌐 www.shopcottageandvine.com
Nancy has beautiful, gift-worthy pots of amaryllis and paperwhites ready to go.
Wishing you a holiday season filled with love and blooms,
Linda
Growing Nigella
Growing Nigella (also known as Love-In-A-Mist)
It’s September and we are past the high heat. The dahlias are coming into their own, with daytime temperatures in the 80’s and nights in the 60’s. Francine is due to bring us some much-needed rain this weekend, which will help get the bloom cycle moving.
This time of year you can also prepare for early spring blooms by direct sowing seed for some cool season annuals. In our area, with our limited cold weather, fall sowing is the way we can provide the right conditions to flowers that prefer cool weather. One great example is Nigella.
Nigella is a favorite for sowing from seed in the garden. Its beautifully delicate flower comes and goes quickly. While cultivated, it has the look of a wild flower. It can be difficult to transport when in bloom. Growing it locally is the only practical way to have it available. Fortunately is is fairly easy to start from seed.


Another great feature of Nigella is its seed pod. As the flowers fade, a seed pod takes its place. These are very long lasting and they can be used fresh in arrangements or dried for fall wreaths and arrangements. Once the pod has formed on the plant, simply cut the stem as you would a flower stem.

Fresh Nigella Pods

Dried Nigella Pods
The blooms and the seed pods vary with the variety of nigella. This one is Nigella damascene. It comes in white, blue, purple and pink blooms.
You won’t see Nigella in garden centers. Growing it from seed can give you an abundant supply. You can find many varieties on the internet. We like to shop at Johnny’s (https://www.johnnyseeds.com/flowers/nigella) and Baker Creek for our seeds. I am not aware of anyone in Columbia who sells this seed. If you have another seed company that you like to use, especially one in the area, please let me know and I will share it in the next newsletter.
Linda
P.S. We still have room in our Fall Wreath Making class on 9/26. We’ll have an abundant selection of dried flowers to choose from, including nigella pods. You can get all the details and sign up here: About our Classes. Come to the farm and experience the joy of specialty cut flowers.
Heirloom Chrysanthemums
Heirloom Chrysanthemums

Heirloom Chrysanthemum Saga No Yuki
In recent years there has been a growing interest in heirloom chrysanthemums. We’re not talking about potted mums that you can find in the fall at every garden center, but rather the more unique, tall, older varieties that have been passed down through generations. These plants pre-date modern hybridization techniques and are the result of natural selection and the passage of time.
Heirloom chrysanthemums have not been especially popular in traditional floristry trends. There was a time when a few varieties were overused and dyed shocking colors. Mums fell out of favor. Many of these beautiful flowers are no longer widely grown.
Fortunately, lots of varieties have been maintained by Chrysanthemum Societies, where plants are grown for show competitions. There is also a company called King’s Mums in Minnesota that has sold a diverse selection of heirloom mums with a wide variety of shapes and colors for many years. Awareness of these heirloom varieties, now grown by local flower farms, has resulted in renewed demand for these flowers.

One reason for their resurgence is their unique bloom time. Heirloom chrysanthemums bloom in late fall, often the last thing to bloom before winter sets in. They need to be protected from hard frost but can withstand the light frosts that we usually get around Halloween. Small flower farms use them for season extension benefits, a late crop to harvest and sell before winter sets in. They make wonderful Thanksgiving arrangements.
Heirloom mums are also an incredibly long-lasting cut flower. It is not unusual for them to have more than two weeks of vase life.
Since these plants are the result of natural selection, there are no patents on them. They can be freely reproduced. Chrysanthemums grow easily from rooted cuttings so this is the most common way to pass them along. Harmony Harvest farm in Weyers Cave Virginia is one of the farms that is taking the lead on expanding chrysanthemum production. They were written up in Southern Living for their efforts. In 2022, a collector of heirloom chrysanthemums passed away and the grower’s wife donated the entire inventory to Harmony Harvest.
Last year I grew 4 varieties as a trial and I am also convinced that the world needs to experience more of these flowers! They are categorized by their shape and by bloom time. There are early, mid and late blooming varieties. The actual time may vary based on where you are located.
Here in the Columbia area, I only grew the late varieties, which started blooming the last week in October. Early bloomers could start in the first week of October, and mid-season bloomers may start in the middle of the month. We are growing across all bloom times this year. If all goes well, some of these will be included in our fall bouquet subscriptions.
We will also have a special offering in mid-November, just in time for Thanksgiving. More to come on that.

Crimson Tide

Kermit
Growing
If you are a grower and interested in trying these beauties in your garden, you can order chrysanthemum cuttings in the spring. Harmony Harvest (https://www.hhfshop.com), Three Porch Farm (https://3porchfarm.com/) in Comer Georgia and Clara Joyce Flowers (https://www.clarajoyceflowers.com/mum-cuttings) in Illinois are three of the bigger farms that sell them.
Other Farm Notes

Things are beginning to shape up at the farm for spring. We continue to see good progress with most of the early flowers. We’re busy getting seeds started and ordering what we need to get through the season. We got some new tables for the processing shed just in time for our new Forcing Bulb class. This time of year, we hold the classes indoors.
We’re using these rainy days to get caught up on lots of planning. It is exciting to look out through the year and organize our growing plans to make sure we have flowers blooming every week.
And I have been wanting to tell you about the Heirloom Mums for awhile and am just now getting it down in the blog. So, I hope you enjoy and also hope you have a very happy Valentine’s Day! We don’t have flowers this week, but a subscription or a bulb class seat might be the ticket. Godspeed.
Linda
Spring Blooming Bulbs - Daffodils
Growing Daffodils
Part 3 of our 3-part “Growing Spring Bulbs” Series is about growing Daffodils (Narcissus). Growing daffodils is a relatively straightforward process that can add vibrant early spring color to your garden or vase. If you do a little research, you can find many varieties of daffodils beyond the highlighter yellow trumpet. We only offer specialty varieties that are harder to find and that are also used in our Early Spring subscriptions. So, if you are not a grower but love our subscriptions, we have you covered too!
For this year, we are offering the following 3 varieties of daffodils. The Mt.Hood trumpet came highly recommended by Bets Daniels of Columbia, SC on one of our Facebook posts. She said that her mother grew them and they are plentiful in her yard.

Need to Know- Daffodil Basics
Daffodils need some cold weather to grow correctly, so not all varieties are suitable for the South. We select only those that do well in our Zone 8 climate (limited cold required) and that have sufficient stem length to work in a vase arrangement. Everything that does well in the South also does well in the cooler zones, 3-7. I don’t recommend them for warmer zones, 9-10.
If you are a beginning gardener, daffodils are a great place to start. They are the most economical bulb because they are easy to grow, multiply in the ground and have limited pests. The flowers are long lasting in the garden or in a vase. They can stand on their own in a vase for a pretty, daffodil only arrangement.
As a more seasoned grower, these specialty varieties can add more color and texture to your existing garden. They offer color when little else is blooming.
The step by step to growing daffodils in your garden
1. Select the proper location: Daffodils need well drained soil and partial to full sunlight. The pink/soft orange varieties do better with a little shade.
2. Planting time: Plant in fall or early winter so that the roots can get started growing before bloom season.
3. Bulb planting and spacing: If you have just a few bulbs, dig a hole 4-6 inches deep for each one. Keep the bulbs 6 inches or more apart so they have room to multiply. For larger quantities, dig a trench and spread the bulbs out in the trench. Place the bulbs pointy side up and cover with soil
4. Water thoroughly after planting. This helps remove any air pockets in the soil and helps the daffodil begin the process of developing its roots
5. Cover with mulch. Mulch will help retain moisture, deter weeds and keep an even soil temperature.
6. Fertilize in spring with a bulb fertilizer. No need to fertilize when planting. The bulbs won’t be ready to take up any nutrients until the roots are formed. We use Espoma Bulbtone for all our bulbs.
7. Maintenance: Remove spent blooms (not the leaves) from the plant. This helps it use more of its energy to grow a bigger bulb for next year. Let the foliage die back naturally for the same reason. Remove brown foliage.
8. Division. Bulbs are busy making more bulbs under the soil. They can become crowded. They need to be dug and separated every 3 – 5 years after the foliage has turned brown. You will know that it is time to divide when the leaves come up and no flowers bloom. You can wait for that, but you can proactively divide every 3 years to have continuous blooms.
9. Harvesting : If you want to take some of these lovely blooms indoors, you can harvest them in what is known as the “gooseneck” stage. This is when the bud is colored and bent over, not yet opened. They will open in the house. By harvesting at this stage, no insects or harsh weather will have a chance to damage the petals. Cut the flower stem at ground level. Leave the leaves behind and uncut. Leaves absorb energy from the sun that restores the bulb for next year’s flower.

Daffodil at gooseneck stage, ready to harvest
10. Conditioning: If you are lucky enough to have daffodils (including paperwhites and heirloom narcissus) and other flowers to make an arrangement, be sure to place the daffodils in a separate vase for 24 hours after cutting. The daffodils secrete a substance that can shorten the vase life of other flowers. Waiting 24 hours to mix them with anything else gives the stems time to heal over so they will not affect other blooms. If you trim your stems mid-week (a good practice for making your flowers last!) you must repeat the healing process before combining them again.
We hope that you have enjoyed this three part series on growing spring bulbs. Will you give them a try? Do you have any other favorites that also do well in warm climates? We’d love to hear from you.
Best,
Linda
Spring Blooming Bulbs - Anemone and Ranunculus
We’re continuing a short series on the “how to” of the spring bulbs we grow and sell. These are the same bulbs we’re growing for our Early Spring bouquet subscriptions. So we hope that you enjoy them, whether from our garden or yours.
Pre-ordering for 2025 bouquet subscriptions will open on December 1, 2024. We will send out more information closer to the date.
Growing Anemone and Ranunculus
If you want to have cutting-garden blooms in late winter and early spring, Anemone and Ranunculus are two great options. While they are very different flowers, they are often discussed together because their growing conditions are very similar. They take a little special handling to get them started but once you have them in the ground, there is very little care required. They will send up multiple stems from each plant, giving you beautiful flowers to bring indoors when not much else is in bloom.
Anemone and Ranunculus are native to the Mediterranean, where it only rains in the winter. From this, they have evolved to go dormant in the summer and then grow during the rainy season. The closer we can come to creating these conditions, the more successful our plantings will be.
Anemone
Anemone Bulb (Corm) Selection
Anemone (Anemone coronaria), is also known Poppy Anemone for the shape of its flower. They are also known as Windflower. Select bulbs based on usage and size.
Two shorter-stemmed landscape varieties are generally available. The de Caen variety has a single layer of flower petals. The St Brigid variety has a double flower. In our climate, stems are 6 – 8 inches tall when grown in full sun. For longer-stemmed cutting needs, use the Italian or Israeli varieties. Mistral is an Italian variety with longer stems.
Anemone corms come in different sizes, from 3-4 cm to 5-6 cm. Larger sized corms are worth the extra cost. Larger corms produce larger plants and more flower stems.
If you are thinking that you knew of anemone as another flower, you are right. There is a shrub-like perennial called Japanese Anemone (Anemone hupehensis). The blooms look very similar to the bulb form but they bloom in a spray in the fall. This is why botanists revert to Latin names for flowers. Many common names apply to multiple plants but each has its own unique Latin name.
Ranunculus
Ranunculus Bulb (Tuber) Selection
Ranunculus (Ranunculus asiaticus) is commonly known as Persian Buttercup and as “rose of spring”. Two strains of R asiaticus are available. The Telecote varieties are the longer stemmed versions with double flowers. These are the more common. A landscape strain with shorter stems is “Bloomingdale”. It is harder to find.
As with Anemone, the size of the tuber matters. With sizes ranging from 3-4 to 5-7, larger corms produce larger plants and more flower stems.
Growing Conditions
Both Anemone and Ranunculus need full sun and good drainage. They can be grown in the ground or in pots, so if you have clay soil, you may want to use a pot or a raised bed. Too much water will cause the corms to rot.
Both are hardy in zones 8 – 11, so you can leave them in the ground. Corms can be lifted and replanted in colder zones.
Anemone and ranunculus like day temperatures in the 60 – 70 F degree range, with nights from 45 – 55F. This means you can plant them in the fall or in February for early spring blooms in zones 8-11. Plant in spring for other zones.
The soil temperatures around 55 F are optimal and once it gets warmer, they will go dormant. They need to be protected from freezing weather. Cover them with heavy mulch if we get one of our freak cold periods.
Anemone will bloom about 90 days after planting. Ranunculus needs the 90 days and 8-12 hours of daylight. Both will begin to go dormant when daylength reaches 13 hours.
So, in the Columbia SC area, the window for growing them is October 1 – April 13th. To illustrate: Pre-sprout the corms for 10 days, starting on October 1, then plant them out on day 11. The anemone would be ready on December 30.
To find the date range for 8-12 hours of daylight in your area, Google daylength, the name of your town and the growing year. You will find charts that map out the daylength/hours of darkness by date. This can be a guide for understanding when to plant and when they will bloom. You can do the same for average temperature ranges. In colder climates, this can be a guide to determine when to plant.
Prep and Planting
Both Anemone and Ranunculus need to be pre-soaked for 2 hours before planting. Put them in a sink, in a bowl filled with water. Keep the faucet dripping slowly, letting the water overflow. This ensures that there is oxygen in the water while the corms are submerged. You can also submerge an aquarium stone in the water to add oxygen.
Once they have been soaked, you can pre-sprout them to ensure that the corm is viable or you can go ahead and plant them. I think it is easier just to plant them. Make sure your soil drains well.
To pre-sprout, put them in a flat of damp vermiculite or potting soil and keep them at 40-50F for two to three weeks. If you soak them and then leave them at 60 or above, they will rot since they stay dormant. The first year I tried to pre-sprout these, I did not take the 40-50F seriously and I ended up with a moldy mess! Try a refrigerator if you don’t have a cool enough space outdoors. White roots will emerge and need to be handled carefully when planting.
Plant the corms 6 inches apart with two inches of soil under and one inch of soil over the corm. Anemones should be planted with the point down. Some have odd shapes. If you are not sure which is the pointy end, plant them on their side. Ranunculus need their legs down in the soil.

Anemone Corm

Ranunculus Tuber
In Season Care
Water them well when they are planted and then do not water again until leaves appear. After the green leaves are visible, feed them with a water-soluble fertilizer once a week until the blooms appear. Stop feeding when the blooming begins.
Cover the plants when weather gets below freezing. If the leaves freeze but the roots are OK, the plant will come back.
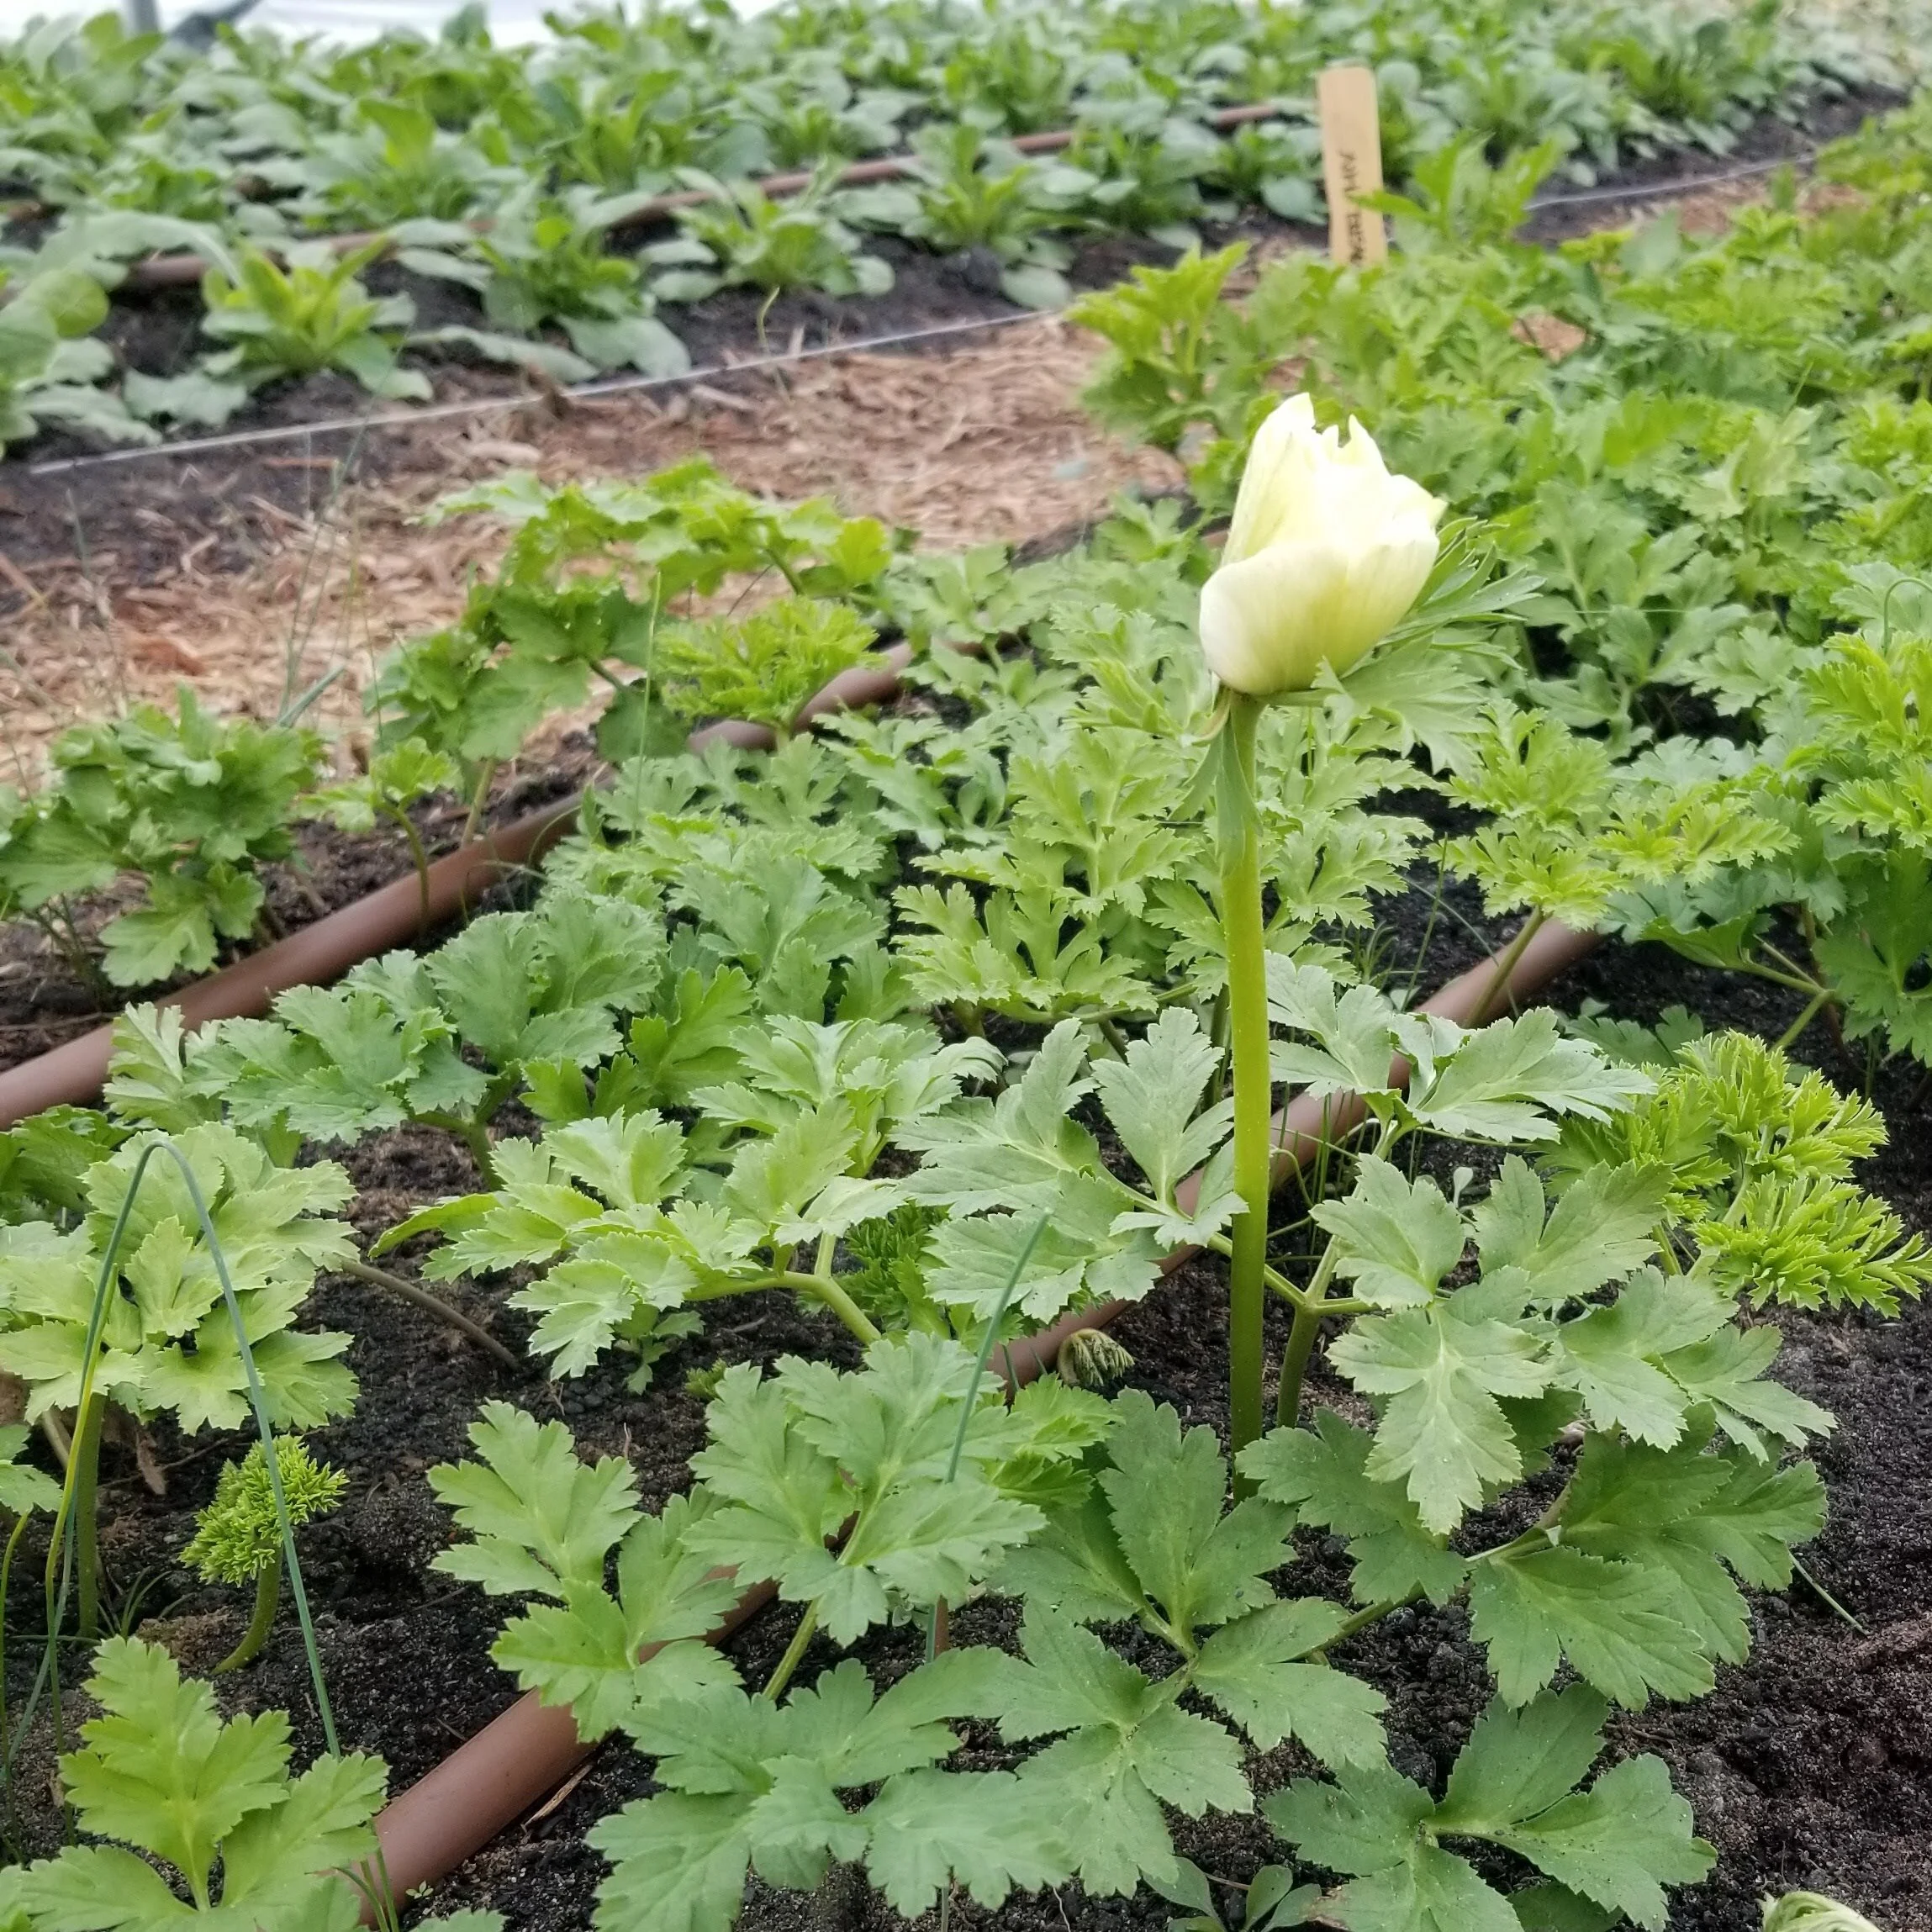
Harvesting Your Anemone Blooms
Anemone open during the day and close at night. They should open more than once before cutting. Cut at the base of the stem, being careful not to cut newly emerging stems.
For the optimal cut, the collar should be about an inch from the base of the bloom. In the photo below, the collar is the proper distance from the base of the bloom for cutting.

Harvesting Your Ranunculus Blooms
Ranunculus petals open from a ball shaped bud. Let the blooms open about half way on the plant and cut the stem at the ground (see pink bloom example above). You can also cut the stem when the bud is colored and soft when squeezed (as shown) and it will open indoors . The second option is handy if rain or a late freeze is in the forecast and you don’t want to risk losing blooms to the weather.

End of Season Care
When the days turn warm and daylight gets to 13 hours, ranunculus and anemone will go dormant. Let the greenery die back naturally, cleaning up after they are yellowed. Leave the corms in place and they will come back when the conditions are right the next year!
Happy Growing,
Linda
Sources:
Growing for Market Magazine/ September 2021
https://www.gardenia.net/plant-variety/anemone-coronaria-poppy-anemone
https://www.gardendesign.com/flowers/ranunculus.html
https://www.easytogrowbulbs.com/collections/italian-anemones
Note: The first post in this series was about growing tulips in the south and was sent out on September 16 2023. https://www.purpletuteur.com/blog/2023/9/16/growing-tulips-in-the-south
Spring Blooming Bulbs - Growing Tulips in the South
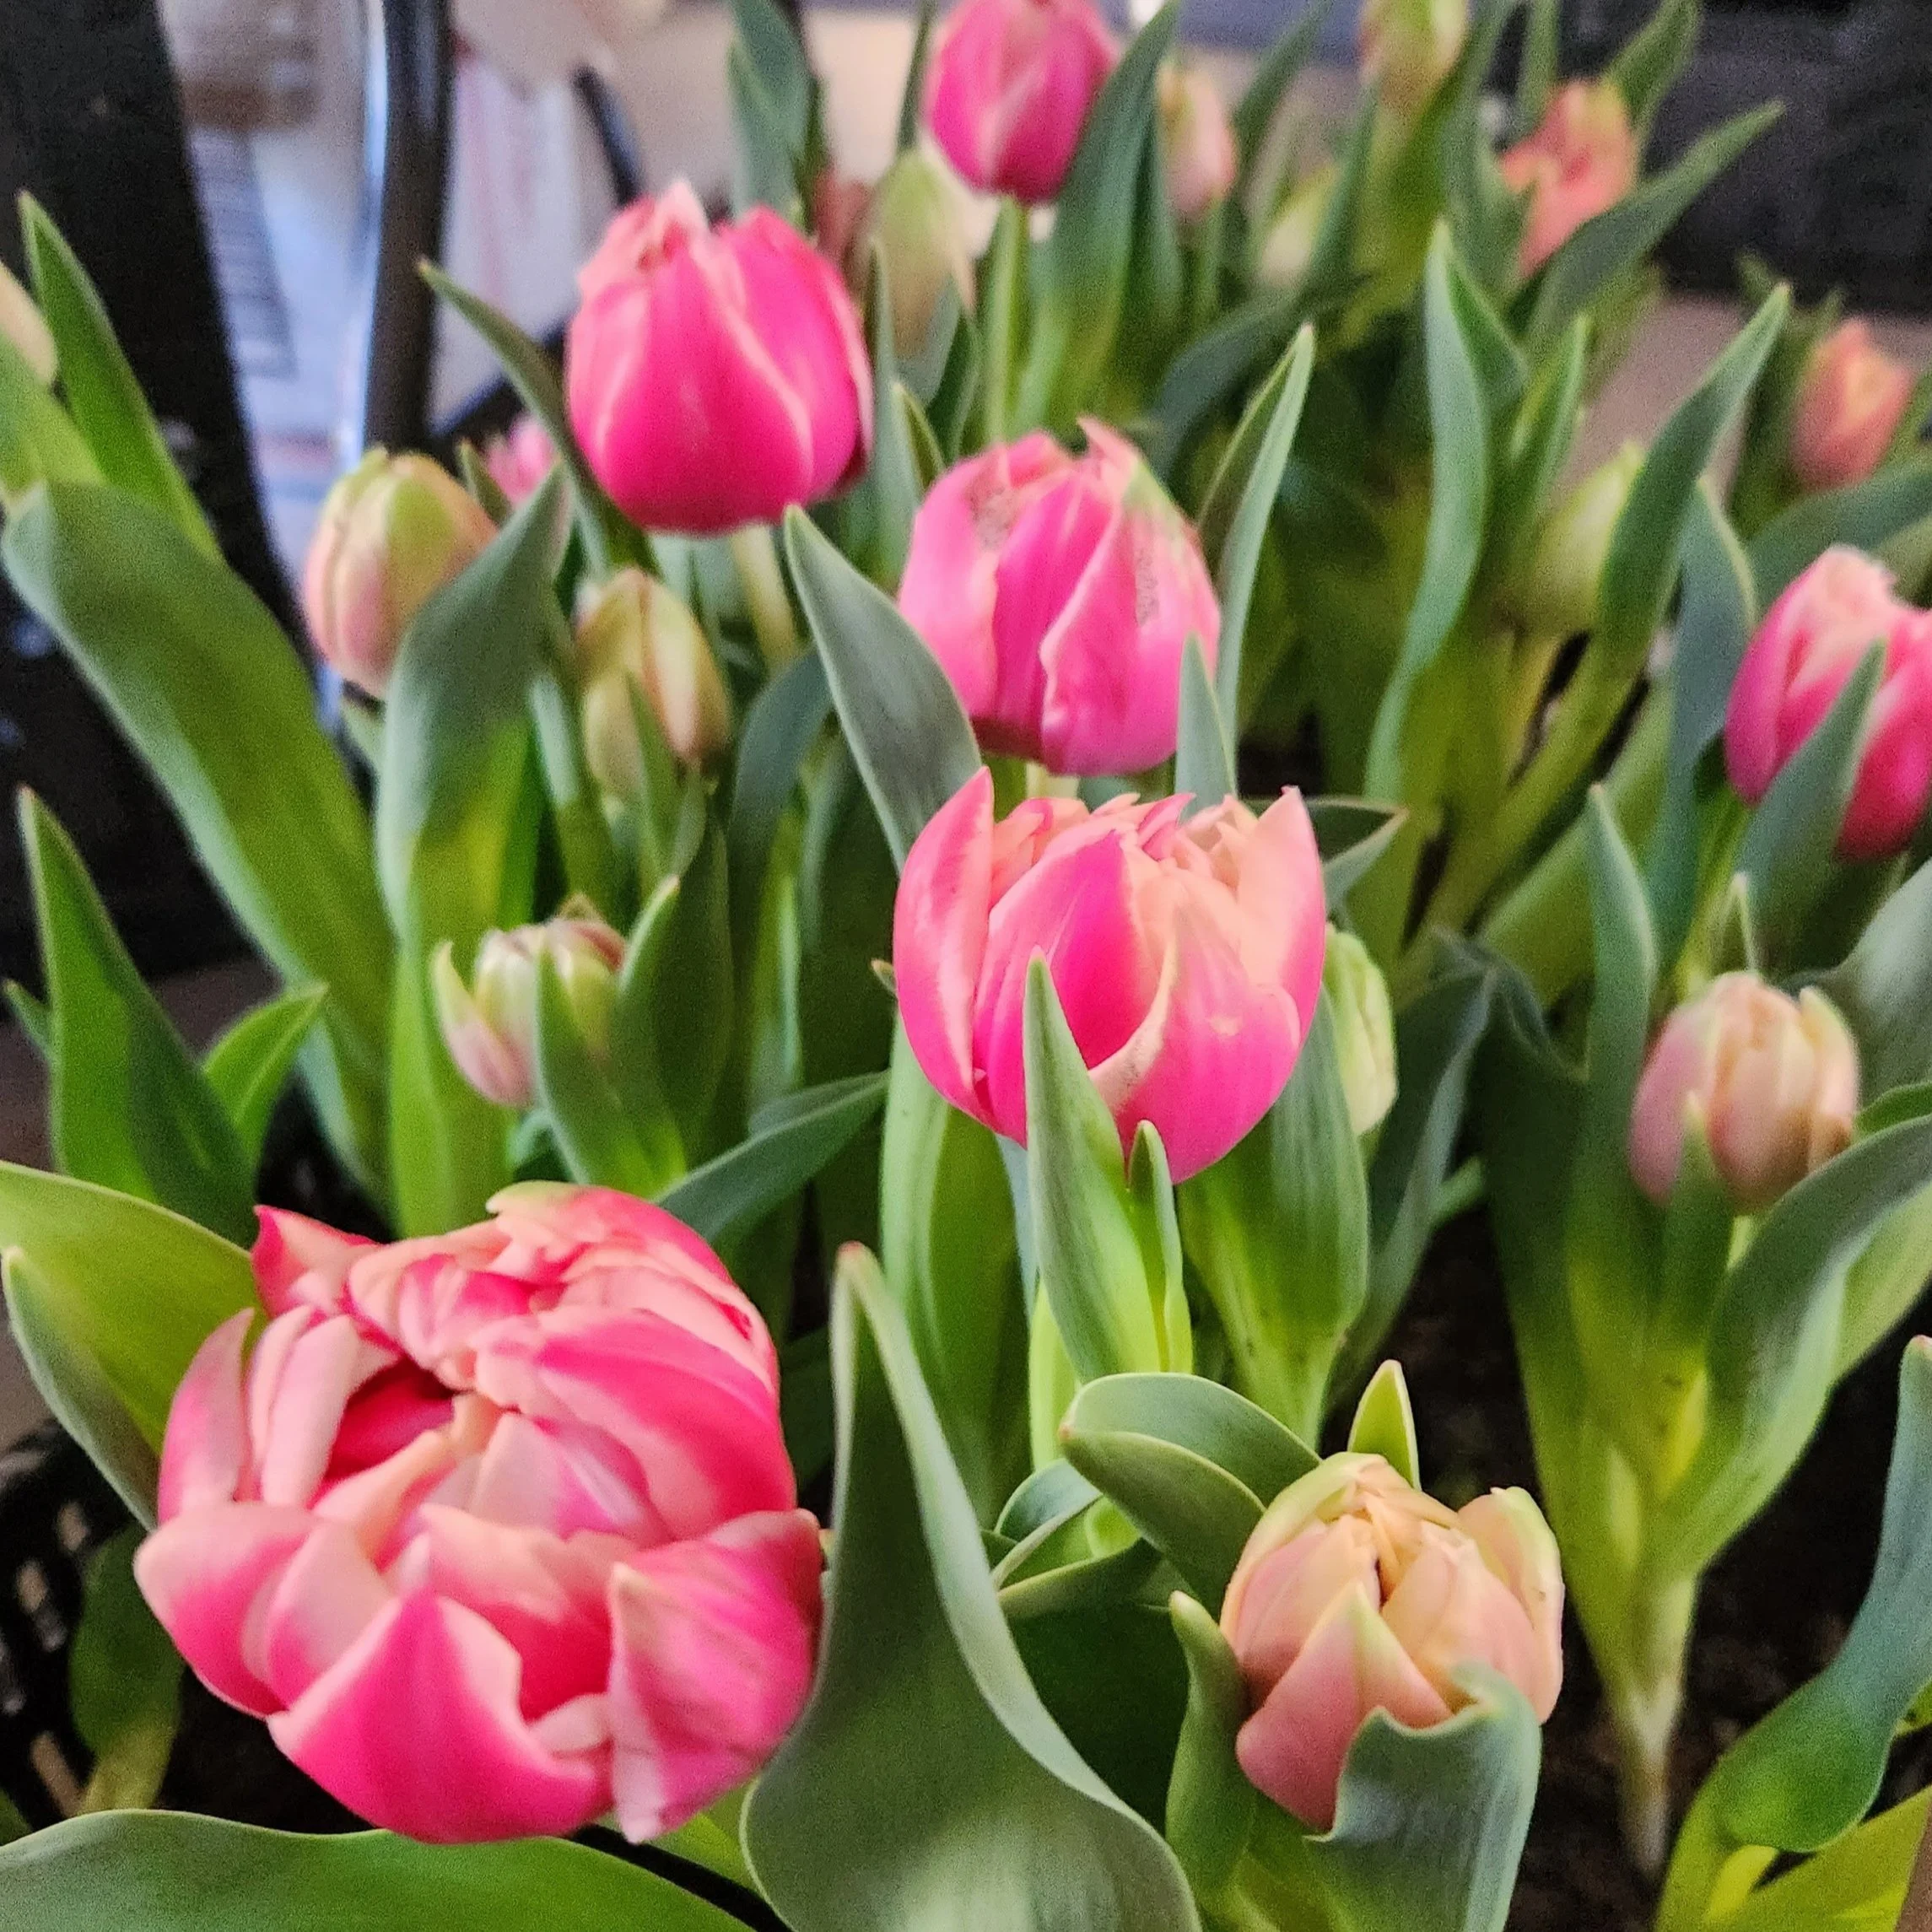
Double Early Columbus Tulip
Growing Tulips in the South
There is a trick to growing tulips in our warm Zone 8 climate. They need 10 – 14 weeks of chilly weather to prepare to bloom, which we just don’t get here. Fortunately, with a little special handling, you can be successful getting tulips to bloom at home.
Buying pre-chilled bulbs gives you a head start on the necessary chill time. Pre-chilled bulbs have been stored in a cooler for at least 6 weeks. The remaining 4 - 8 weeks can usually be accomplished naturally in our climate.
You can also buy tulip bulbs in the fall and leave them in a refrigerator for 8 – 10 weeks before you plant them, making sure to get rid of any soft or moldy bulbs. Planting them outside in early winter will give you enough natural chill time for spring blooms here. It also helps to plant them outside in a pot. The soil in a pot stays cooler than the ground.
Regarding care, tulips need a regular weekly drink of water, either from rain, irrigation or hand watering. If you keep them partially shaded, the stems will be longer than if you plant them in full sun. Sudden swings in temperature (like what we experience in February and March) will hurry the blooms along, and you may still have short stems.
Harvest the blooms when they are still closed but showing some color. Pull the entire plant up, bulb and all. Tulips are effectively annuals here, so no need to leave the bulb behind. Trim the bulb off and put it in your compost bin along with any leaves that you want to remove. Rinse off all visible dirt. Place the stems immediately in water.

Apricot Impression Tulip harvested with bulb on, barely showing color

Apricot Impression, a few days later, showing more color
When selecting a vase for your tulips, keep in mind that they will continue to elongate in the vase. Tulips are very sensitive to light and will bend toward it, so you may want to turn the vase occasionally to keep them more upright.
Happy growing,
Linda
Introducing Solidago Romantic Glory and Notes on Dahlia Care in the Heat
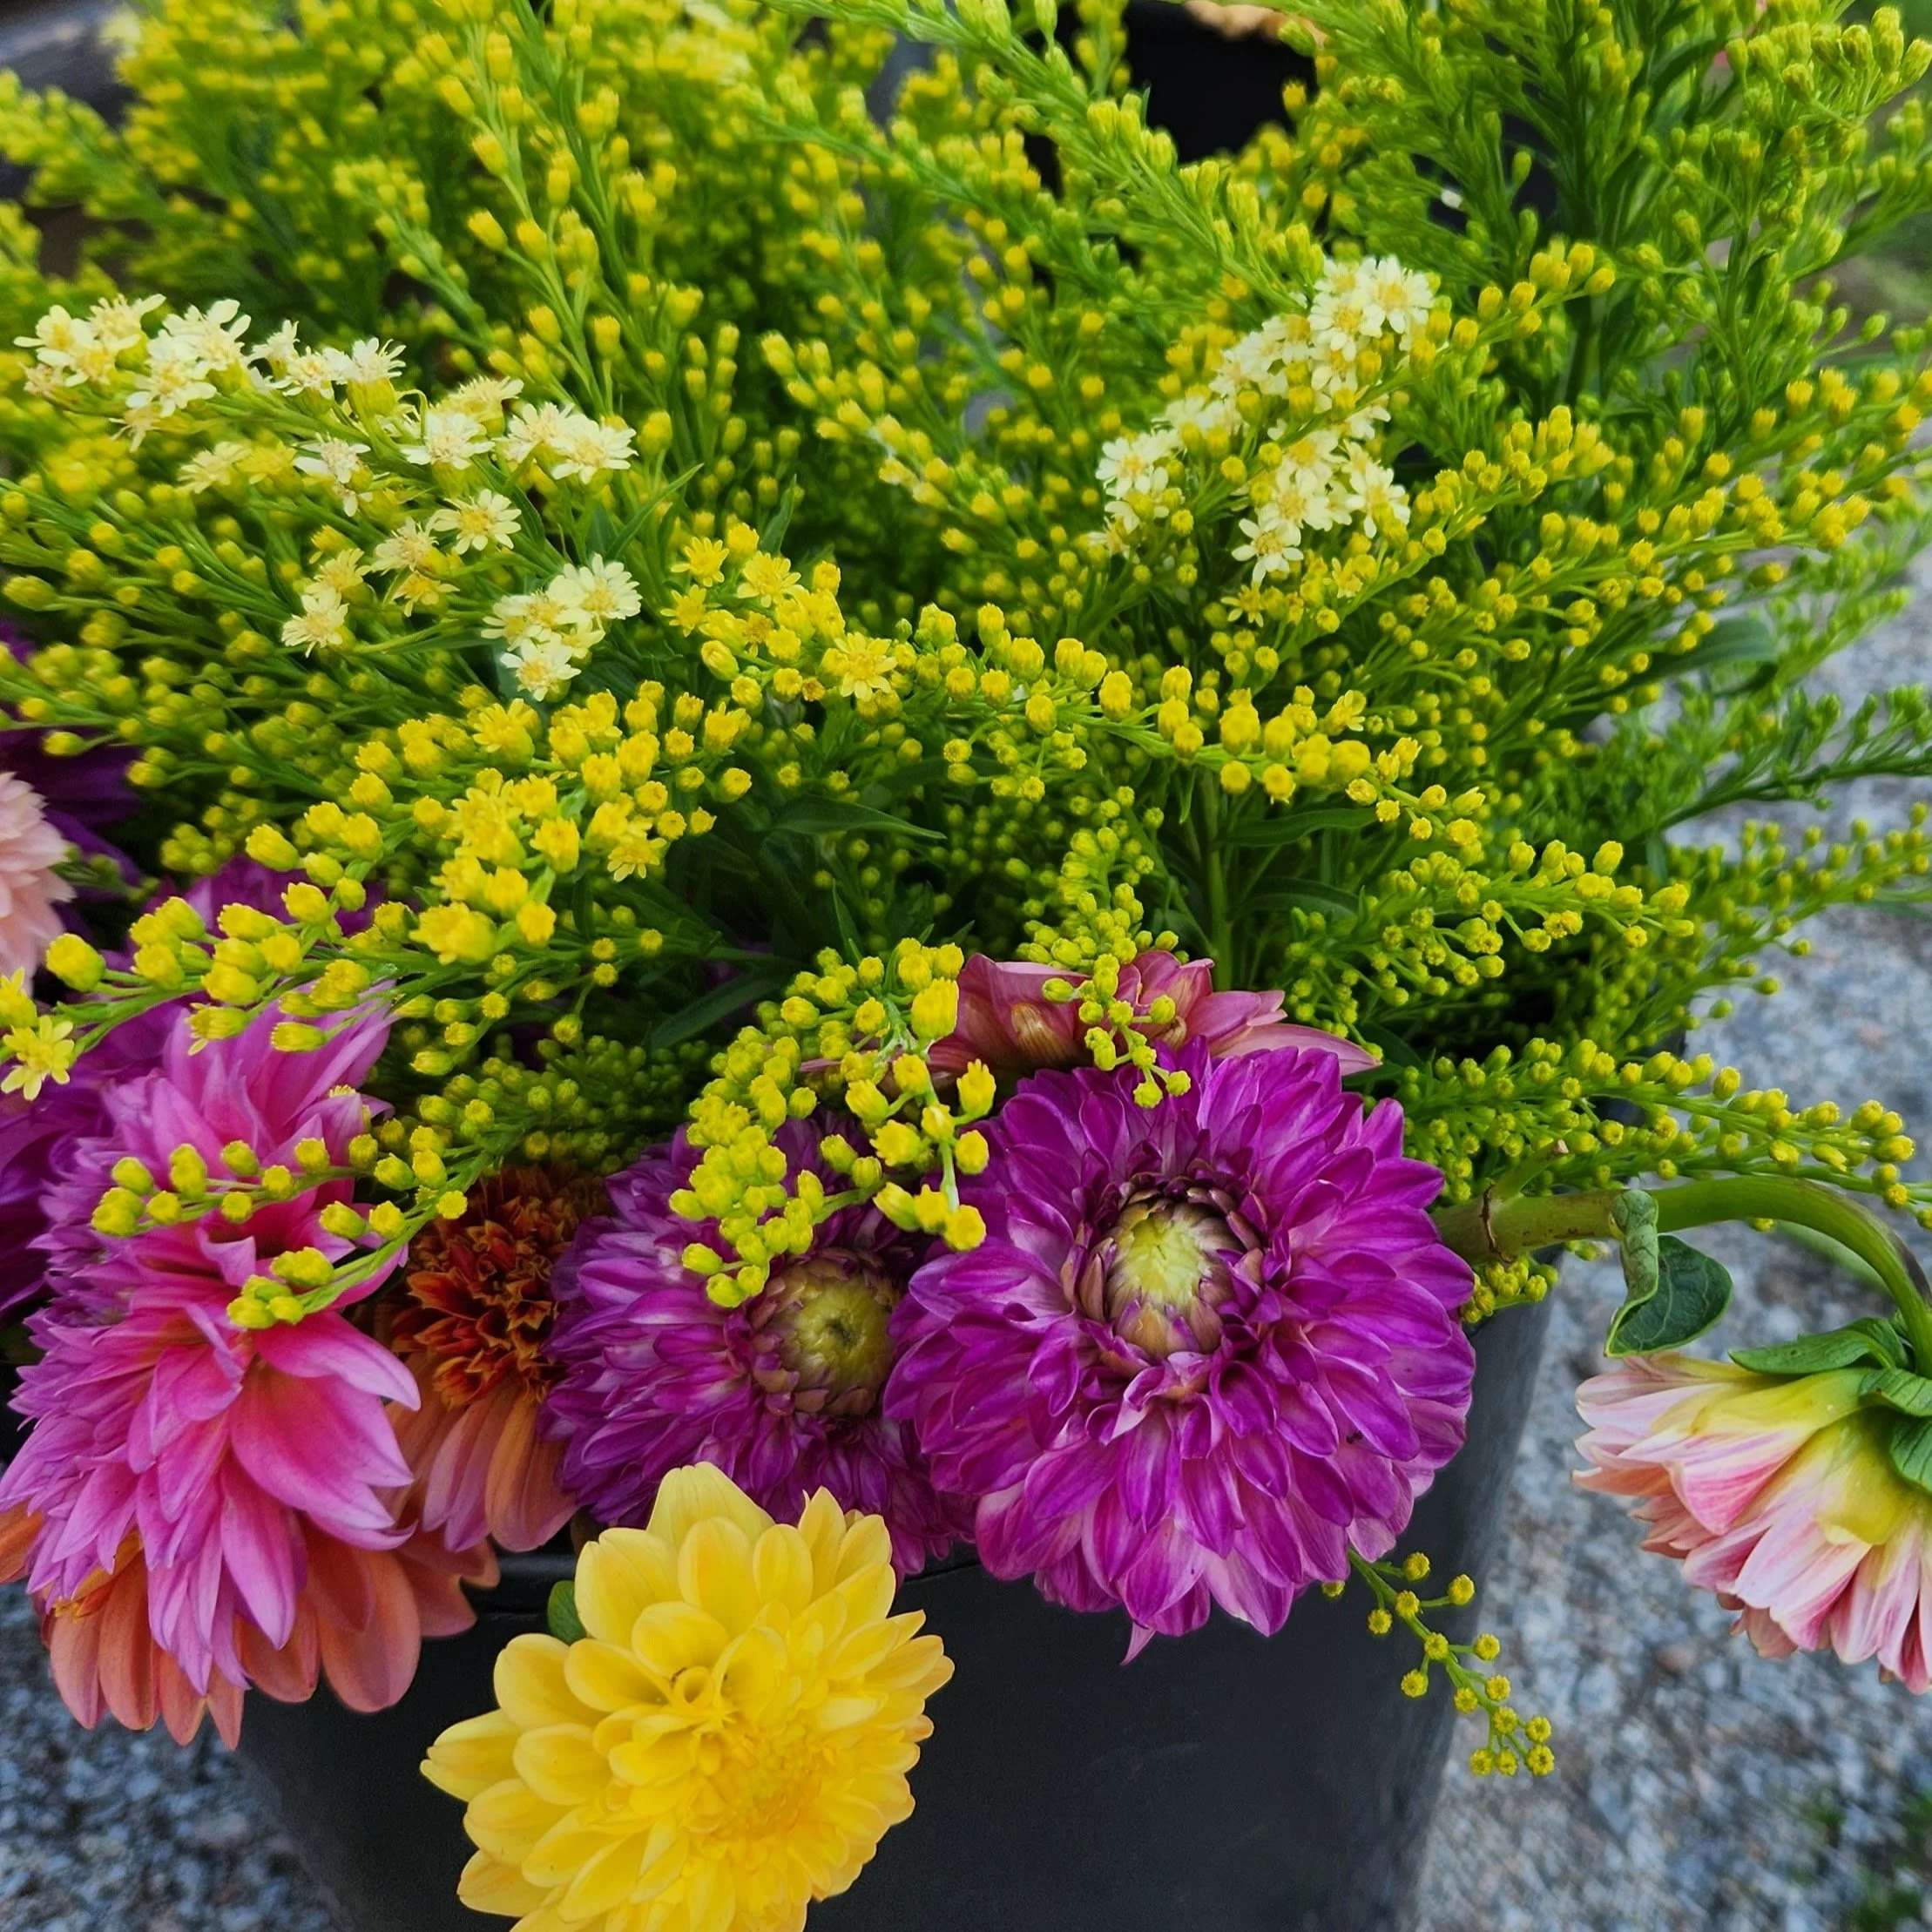
New Plant - Solidago Romantic Glory
We’re getting the first harvest of our new Solidago, called Romantic Glory (Asteraceae Solidago Romantic Glory). This is a great bouquet filler for this time of year. It can take the heat and is fairly drought tolerant. While many varieties of Solidago have a yellow bloom, this one is almost creamy. The flower is a bit larger than other varieties too and seems like a refined feverfew. Bred for cut flower production, it has strong stems. The plant grows about 4 ft tall and 2 ft wide. A perennial, we look forward to having this for several years to come.


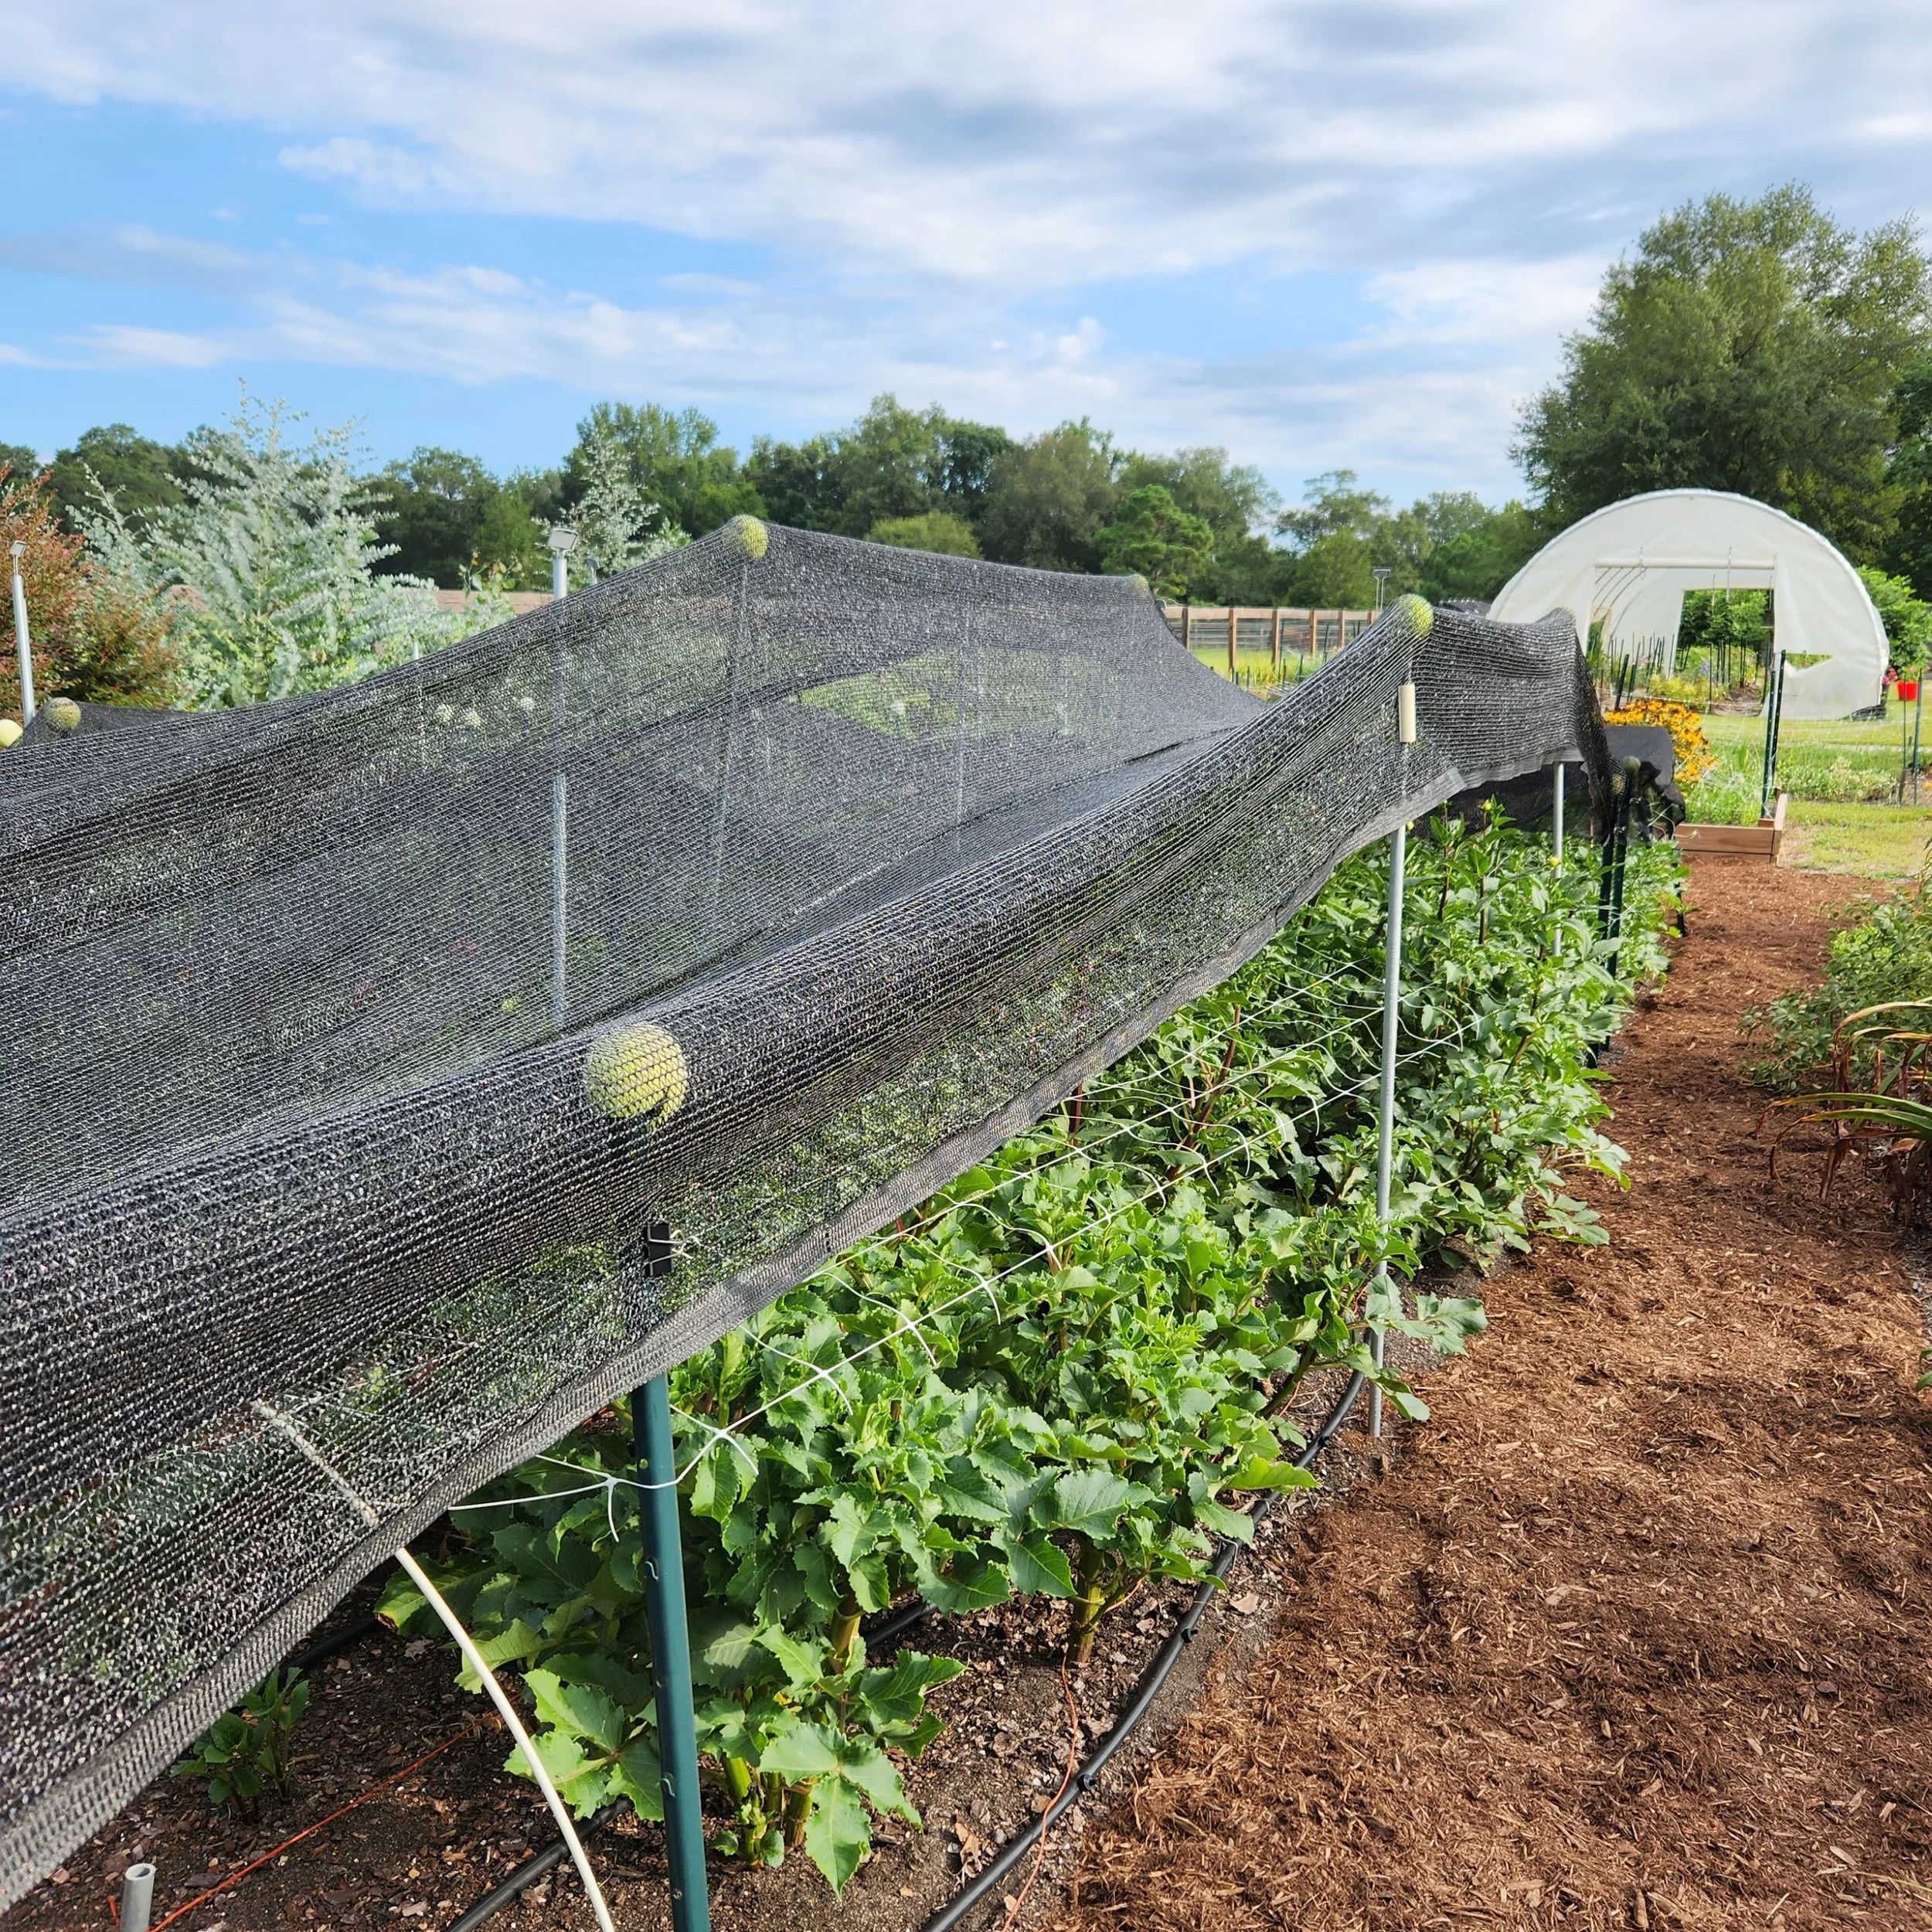
Protecting dahlias in the heat
We added shade to our dahlias to protect them from the 100 F heat this weekend. We are also watering them daily to keep them well hydrated. If you have some growing in your garden, try to give them some cover this weekend. Next week’s temperatures are predicted to be back in the 80’s. Rain is in the forecast too. These are both wonderful improvements in conditions for the dahlias and they will respond well! Even with the heat, these are tough plants. If the heat has made the foliage yellow or wilted, just cut it back. The tuber will produce new, healthier growth as the weather cools. The best of dahlia season is yet to come.
Coming up
Fall Wreath Workshop
We still have room in our Fall Wreath Workshop on September 20. If you would like to join us, please register online at www.purpletuteur.com Feel free to contact us with any questions.
fall bulb sale
Our Fall Bulb Shop will open for pre-orders on September 16th. This sale includes spring bloomers like anemone, ranunculus, daffodils and peony roots. This year we are introducing U.S. shipping for our bulbs! So now you will be able to pick up at the farm or have them delivered to your door. Order fulfillment will begin in late October, the best time to plant spring blooming bulbs in the South.
Please stay hydrated this weekend!
Linda
Behind the Scenes - Our Winter Peony Project
New Peony Project
This past winter we added another 40 peony plants to our supply. I selected two new (to us) varieties to include more colors, yellow and white. Both Sunny Girl and Duchess de Nemours are early blooming varieties. Early blooming is a requirement in the Columbia area and all zone 8 regions. They bloom before the end of May, when the warmth makes them go dormant.
We plant bare roots, so they won’t be productive until their third bloom season. They are far more affordable than potted plants and transplant easily. Bigger roots produce more flowers sooner, but they will all produce by the third year. The one shown is Sunny Girl and they are huge. They are priced accordingly.
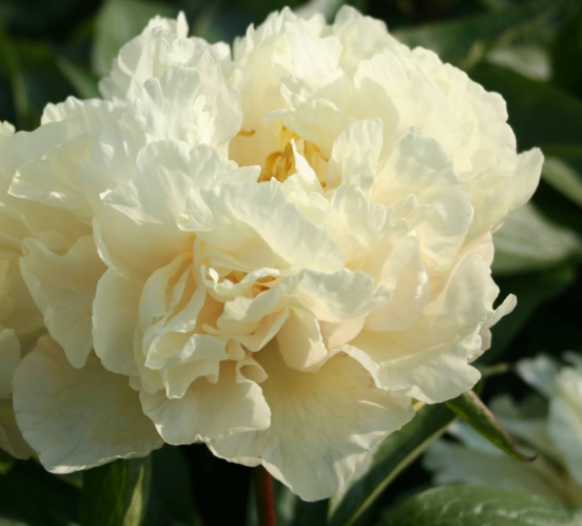
Sunny Girl

Duchess de Nemours

Peony Bare Root
We use raised beds for our peonies. Peonies need cool weather to grow properly. Planting them in a raised bed keeps them cooler since the air can chill the above ground soil better than planting in the ground. The beds are in full sun.
A raised bed can be made with mounded dirt and no boards, but we use these for ease of harvest. If you are planting these at home, you can use a pot (at least 24” in diameter). If you have a retaining wall, the soil behind it is elevated too, making it a good spot.
We had a week to get this done to beat three days of rain that would have made it much more difficult. The first day we got the supplies to the farm. The second day we built the frames. They are set right on the grass since the soil will smother it. We put hardware cloth in the bottom of the beds to deter moles and voles.
The next effort was to fill the beds with soil. We mixed topsoil and mushroom compost together. Any compost with pine bark (most of them) should be avoided. The bark carries something that the peonies are vulnerable to. Mushroom compost works well. The fertilizers were also mixed into the soil at this point. This part took two days.
The last day’s effort included laying the irrigation, planting the roots and mulching. In our climate, the roots need to be planted just one inch below the top of the soil. This will also help keep the plants cool. We mulch with coastal hay. This forms a weed barrier and breaks down easily, providing a little nutrition to the soil.
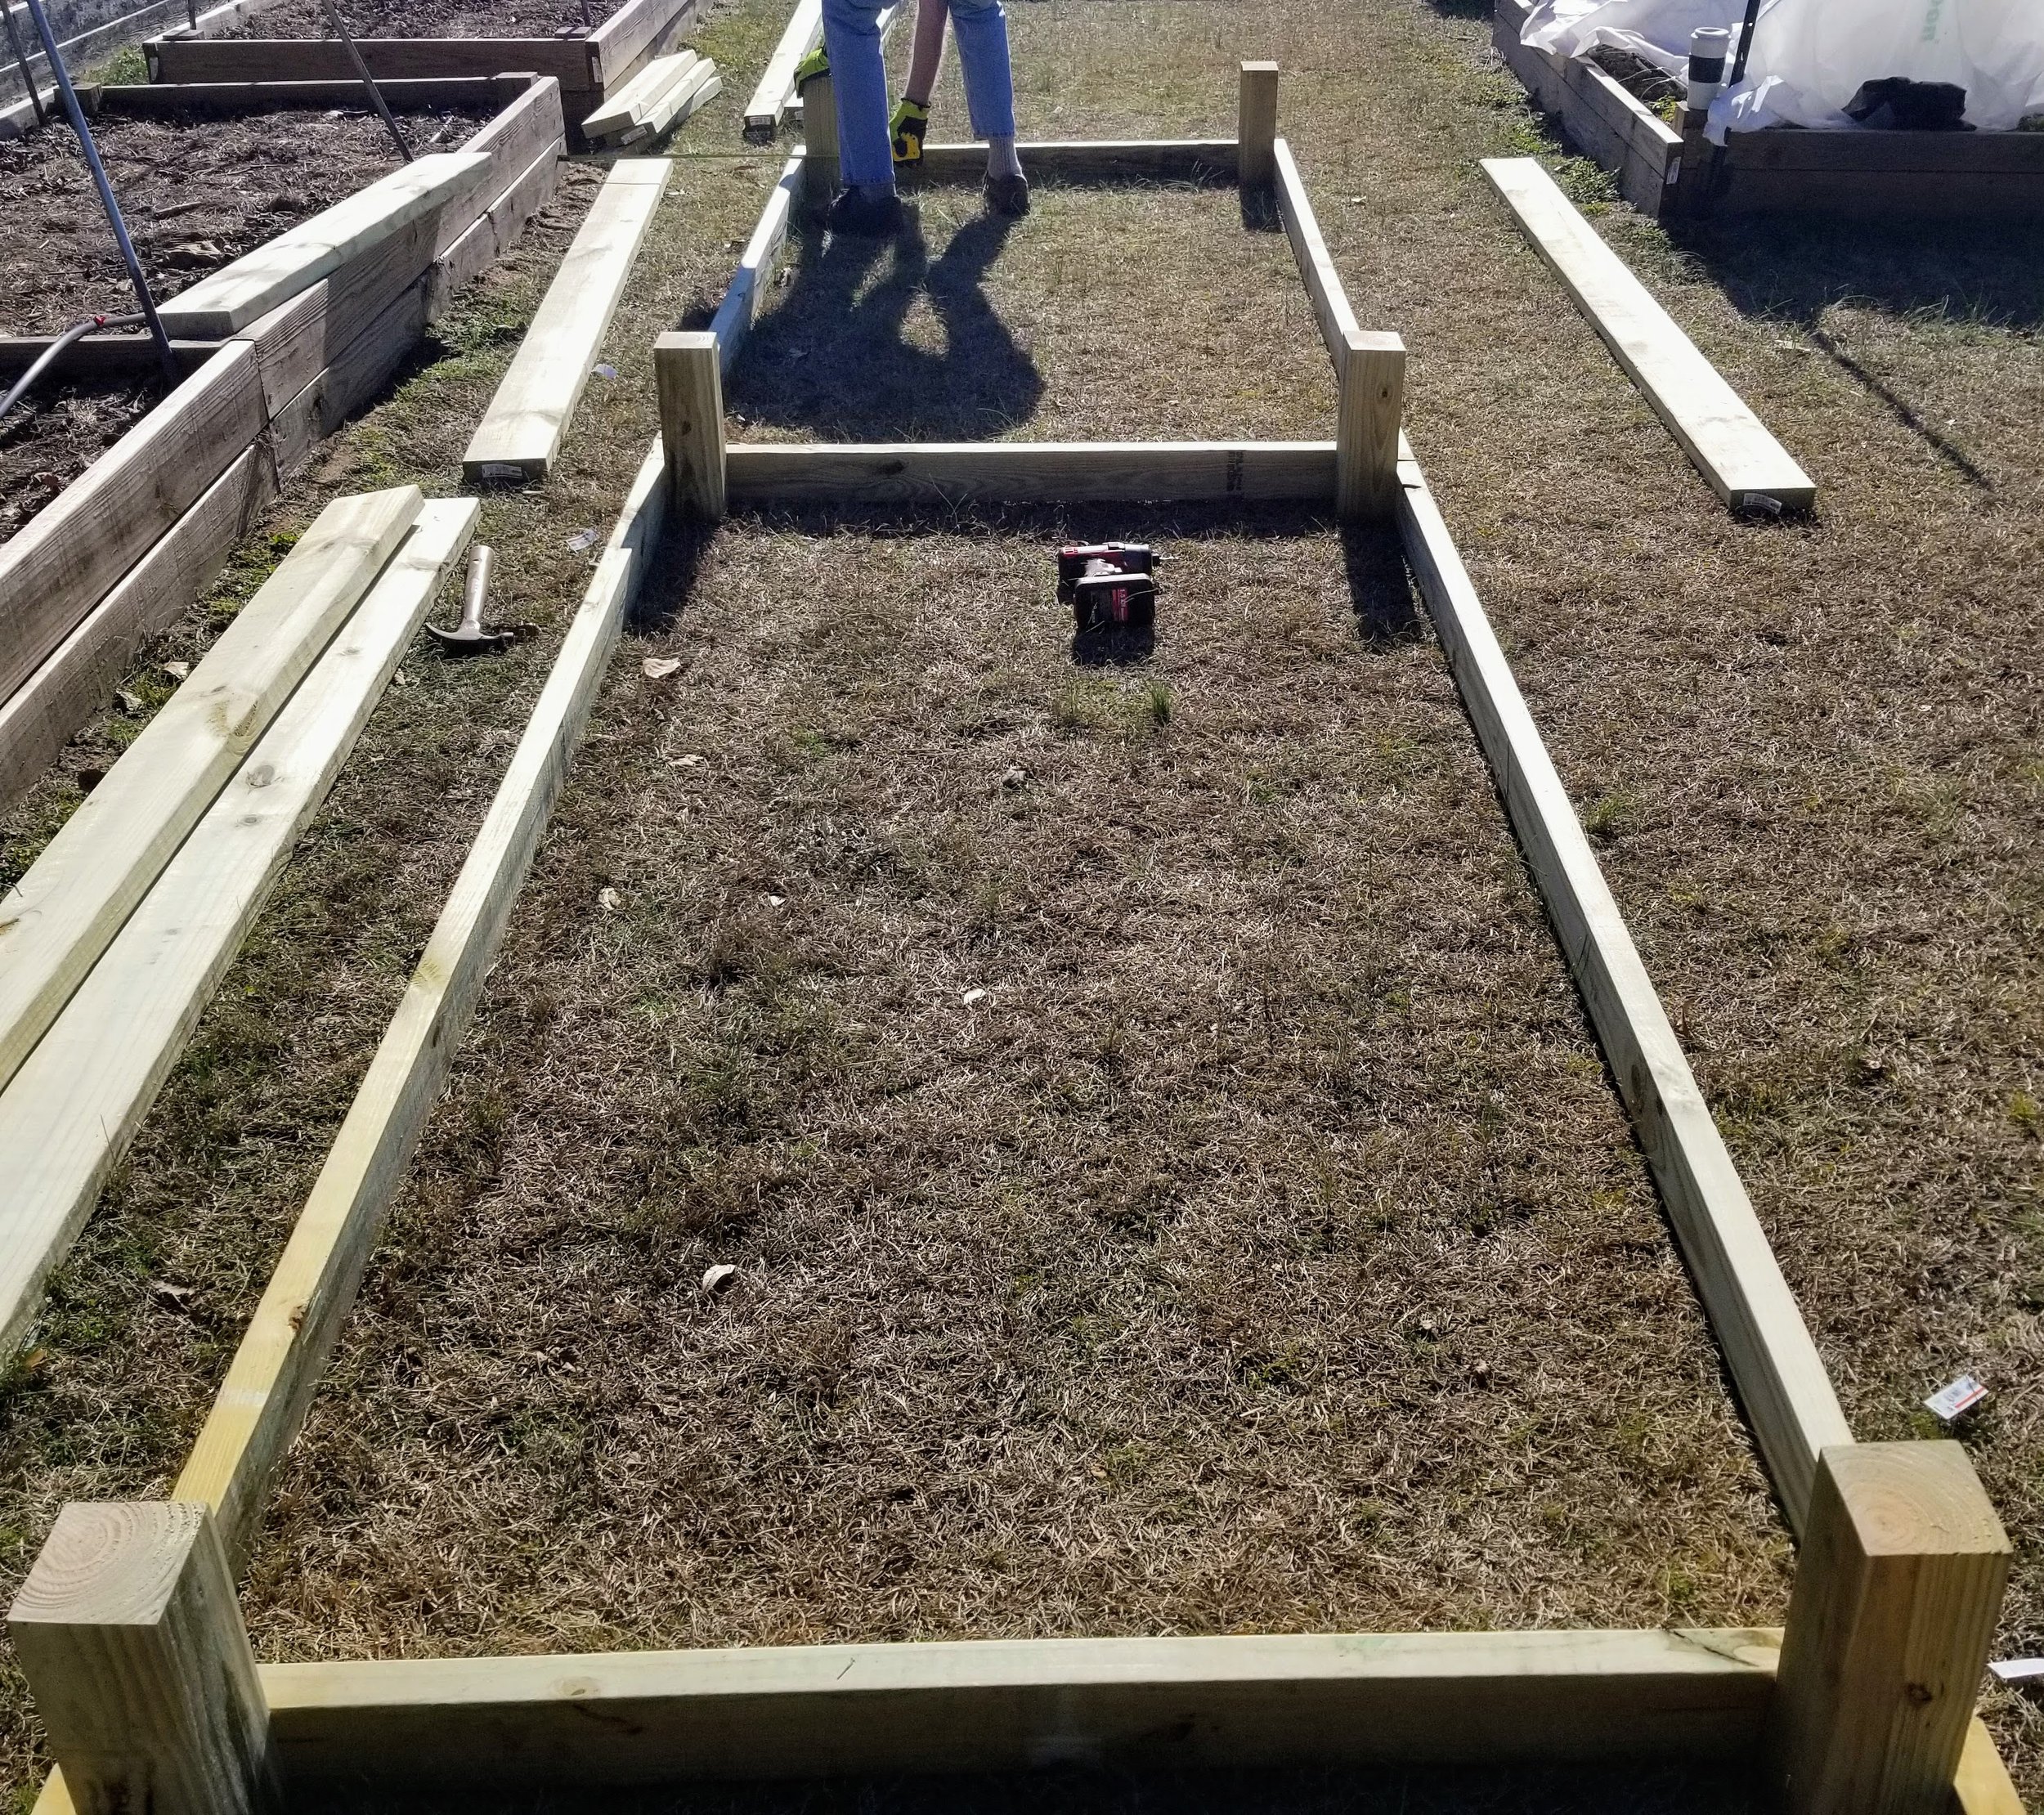
Building the raised bed
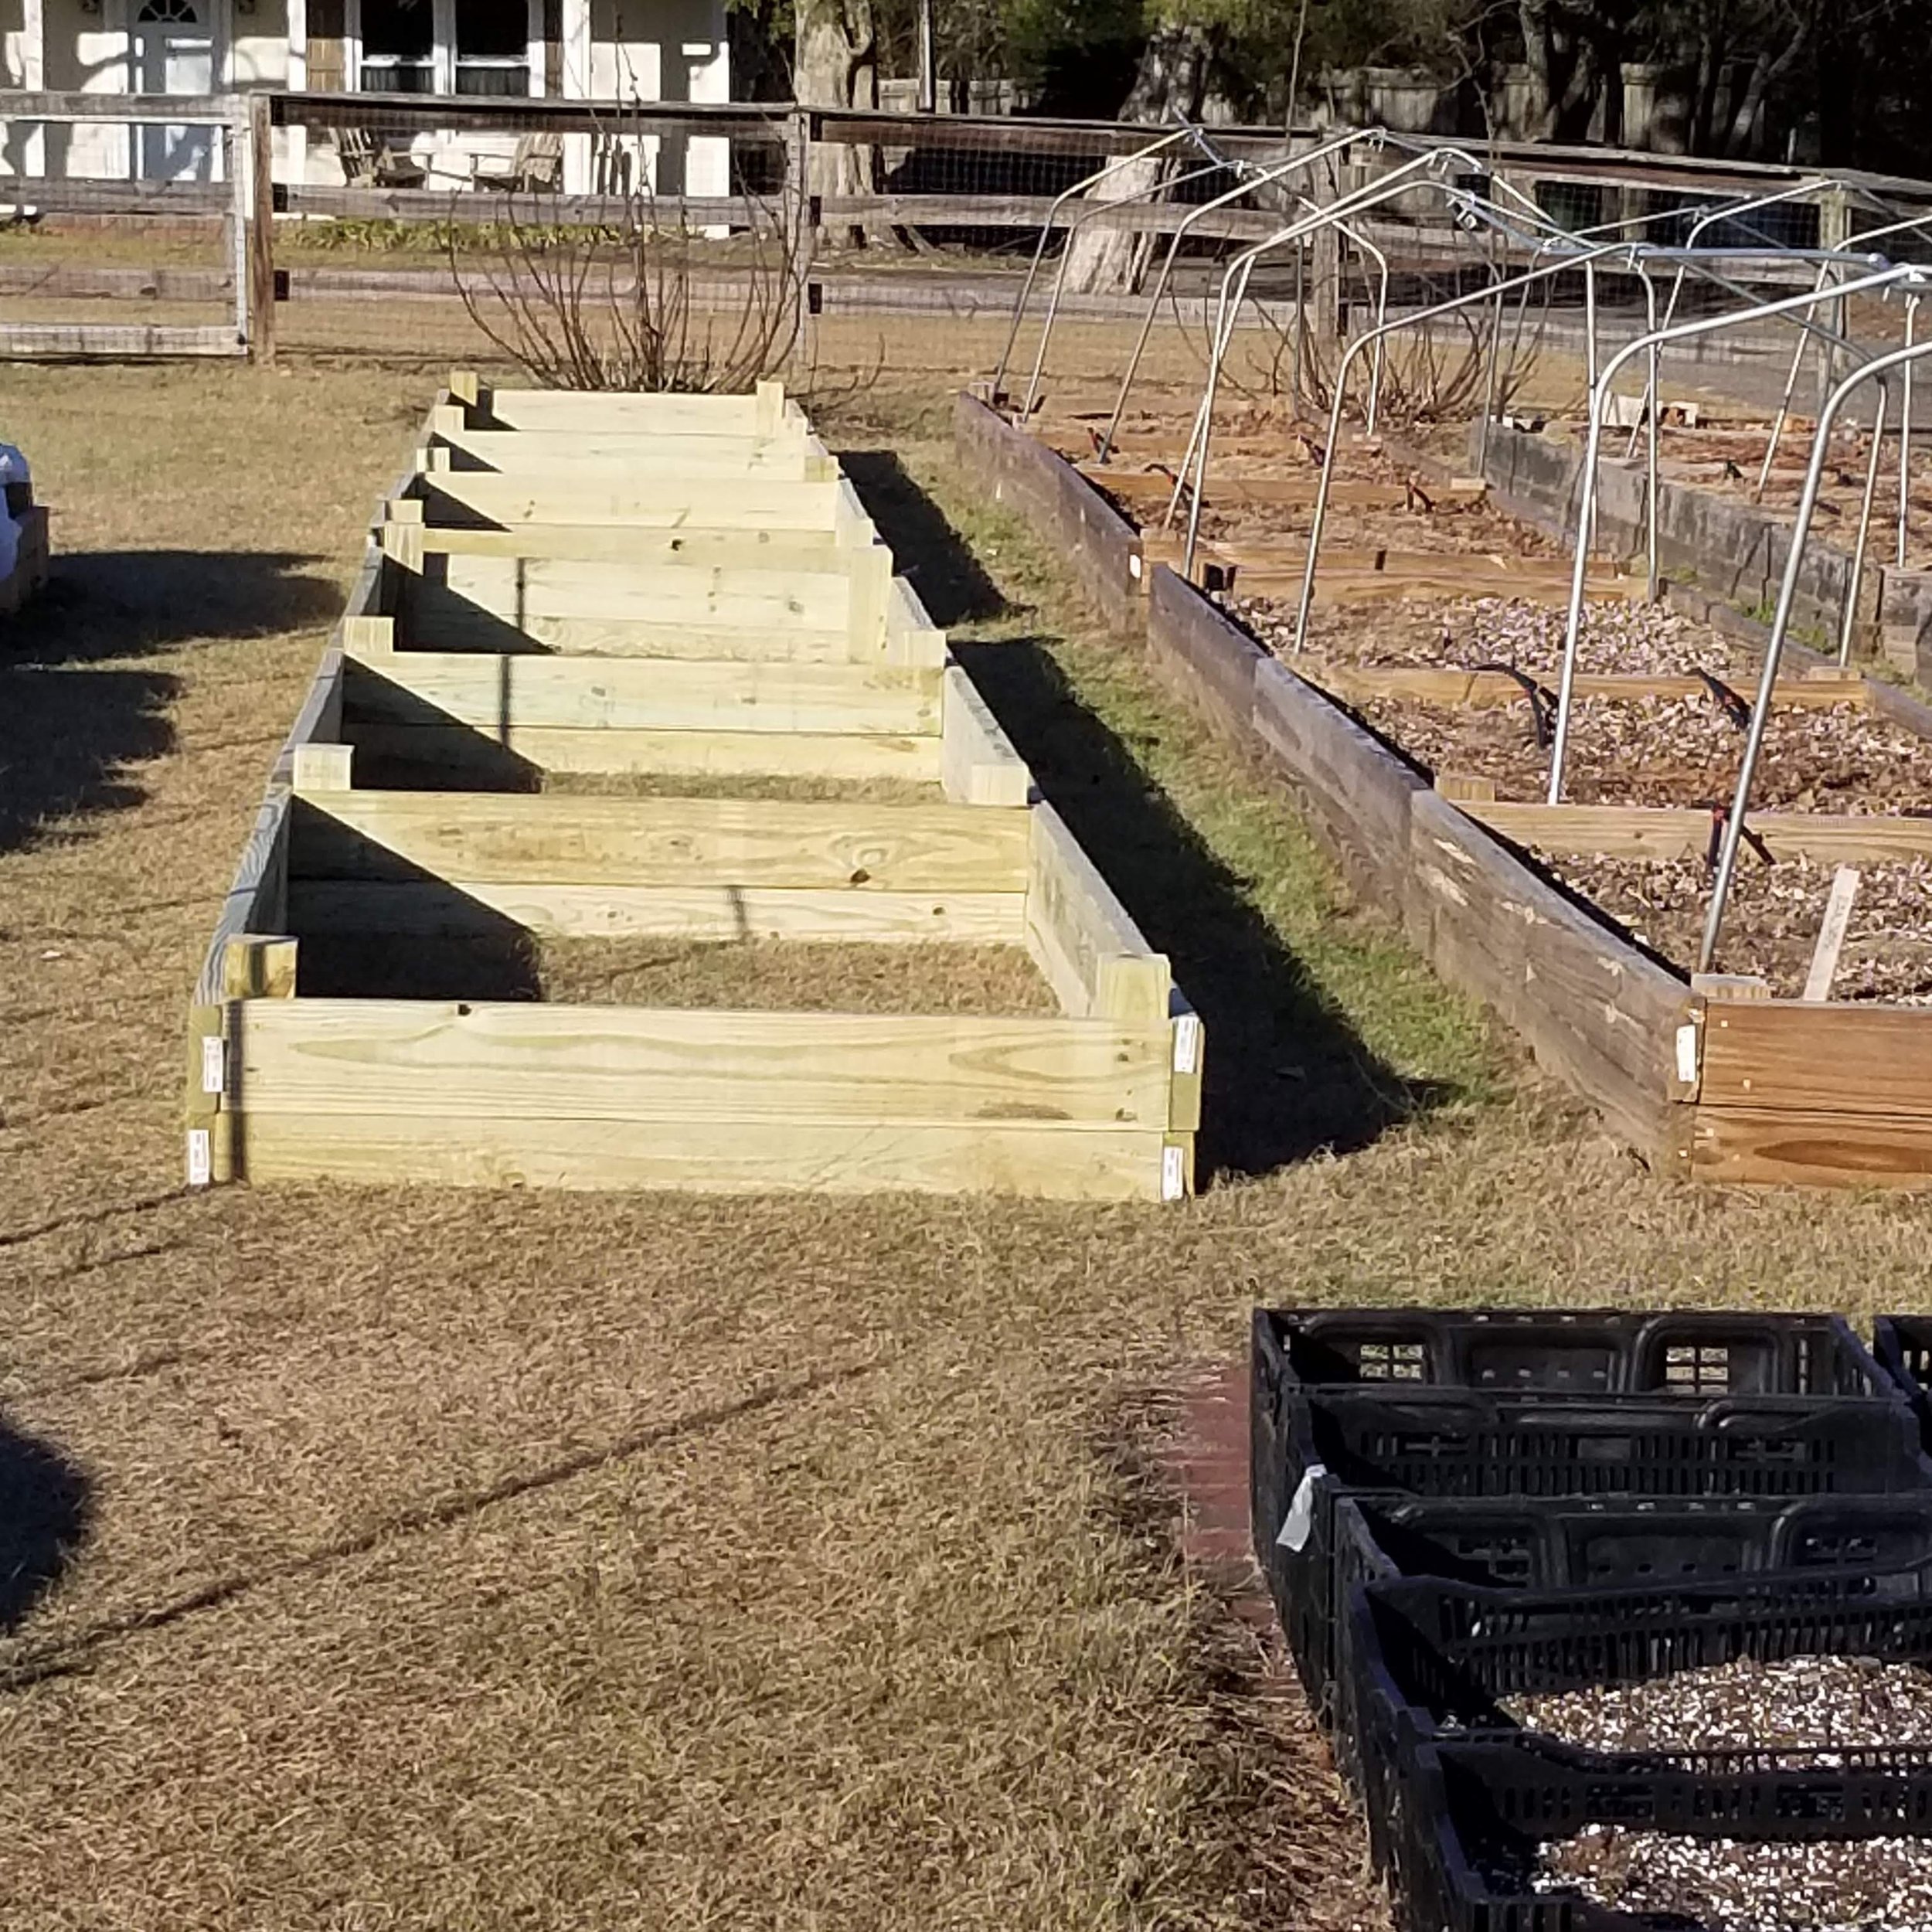
Raised beds done!

Filling the beds with soil
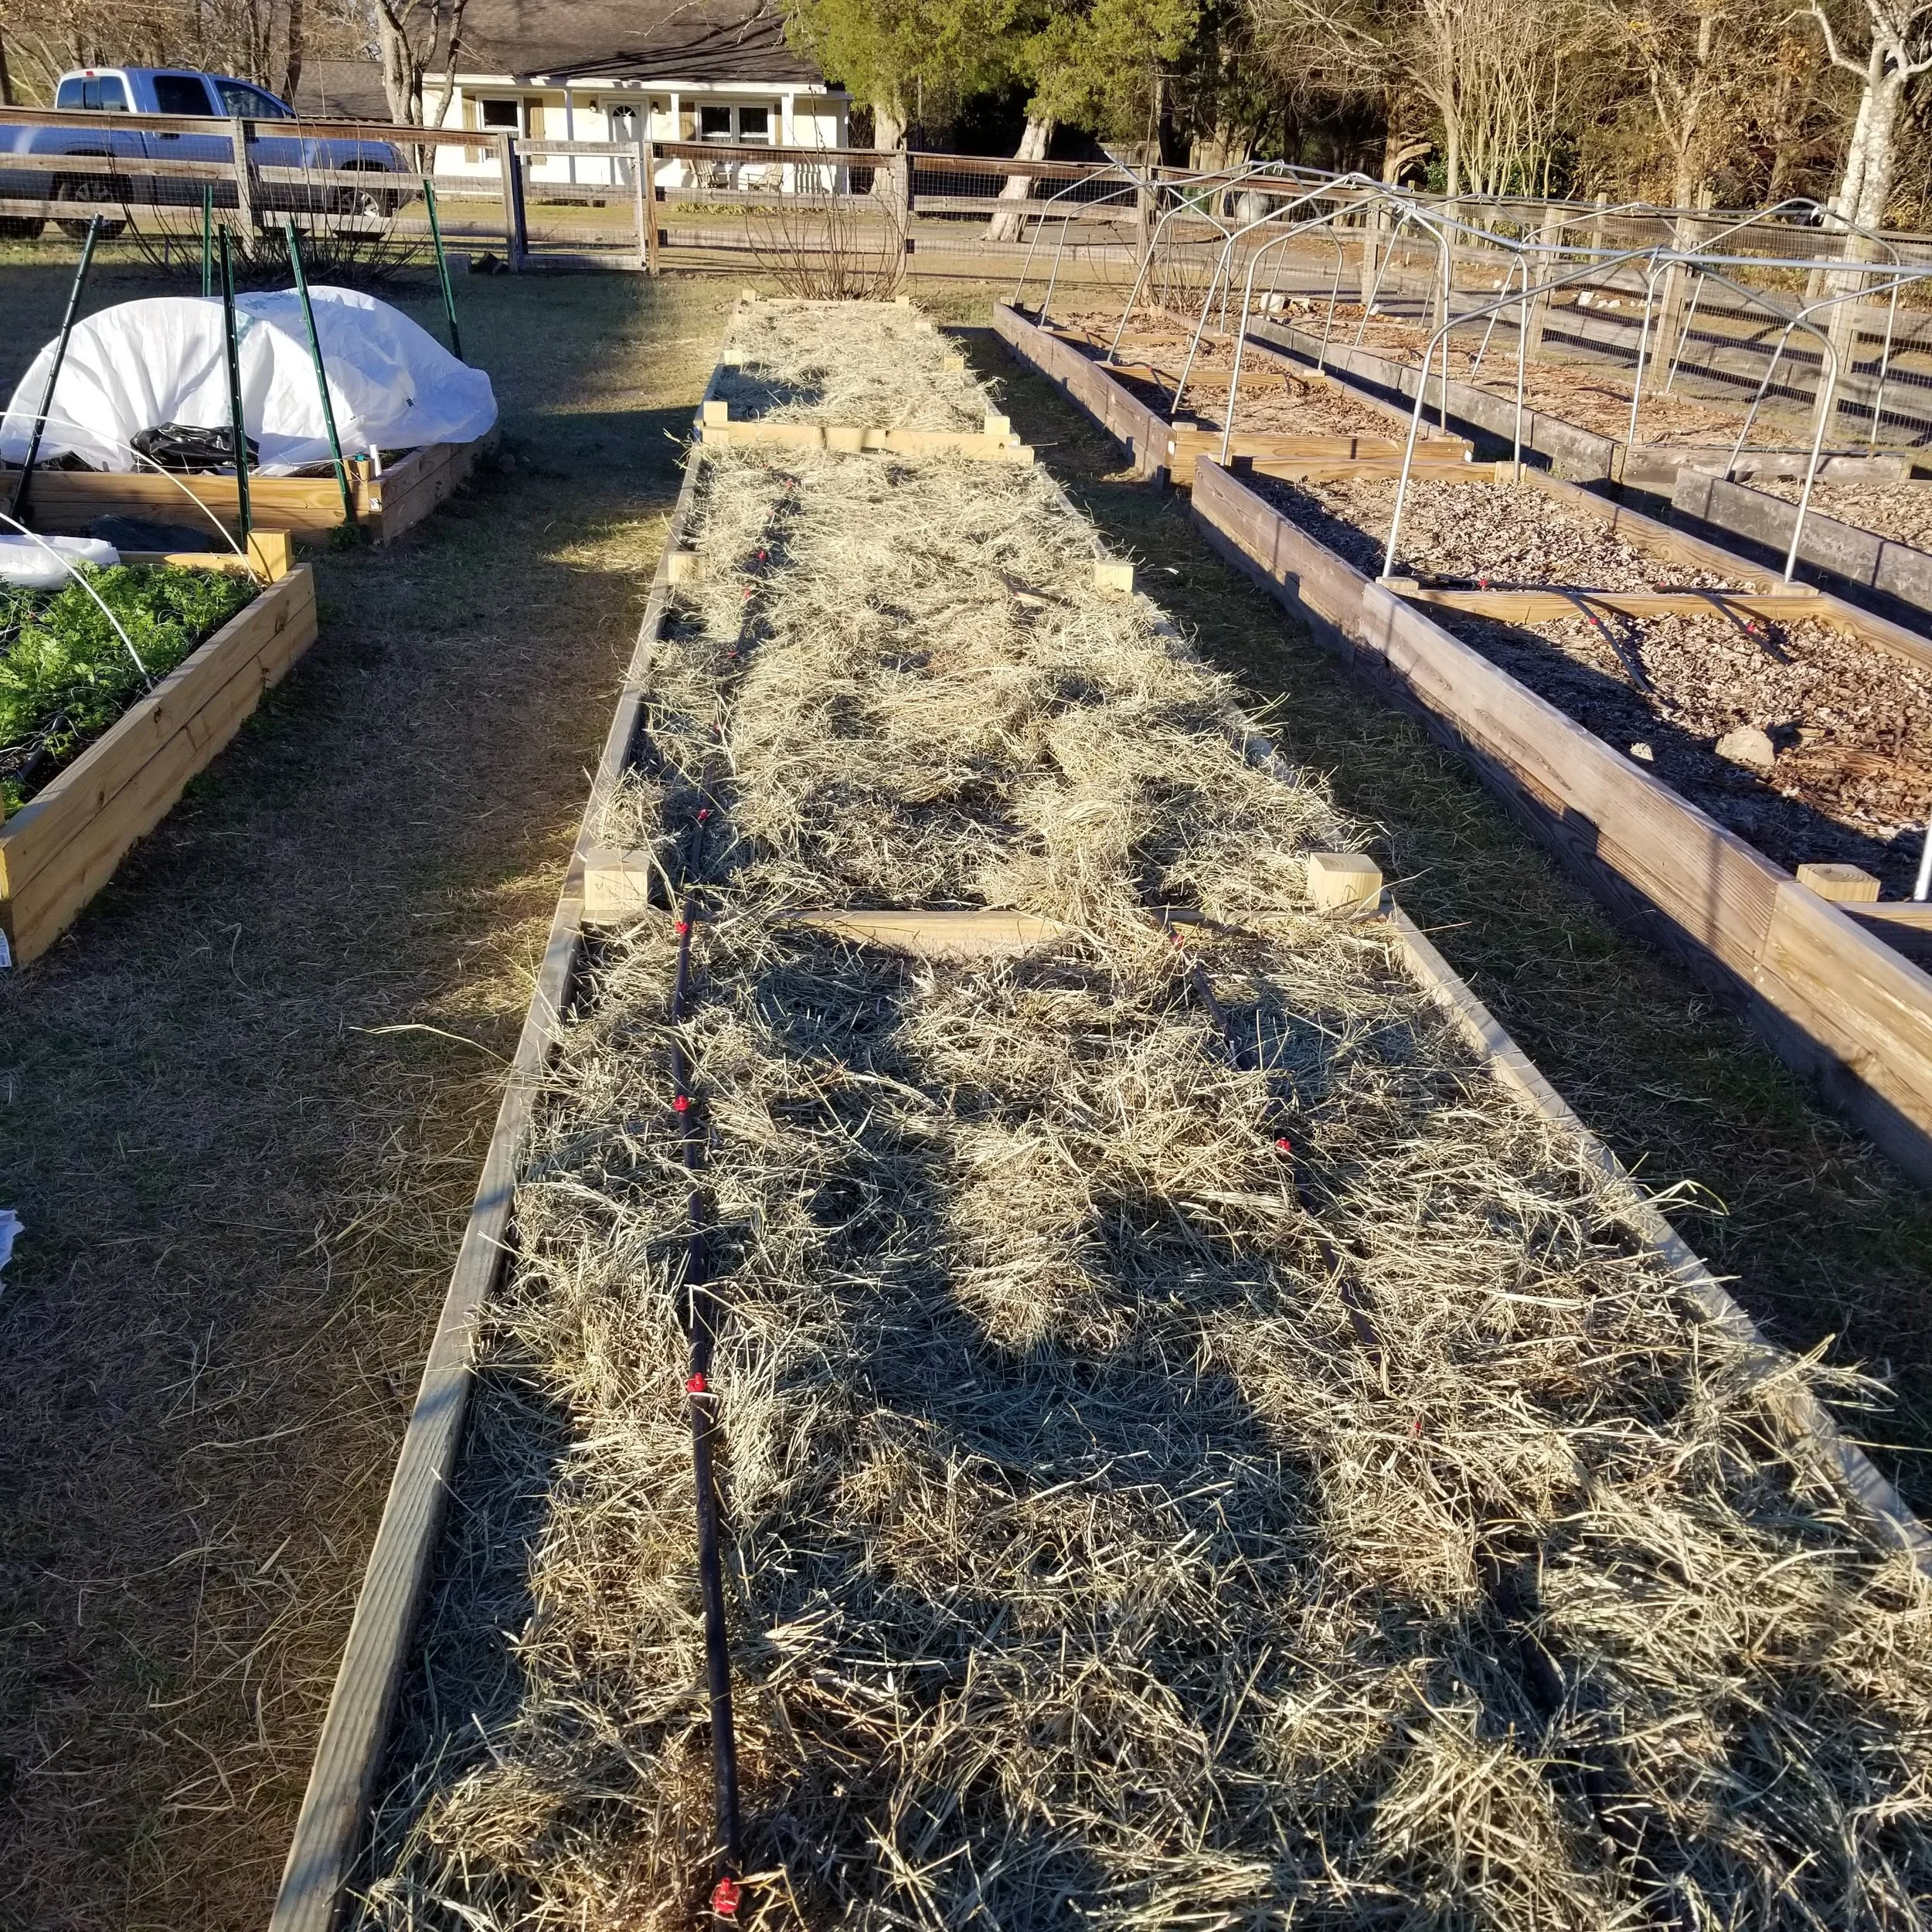
Completed! Planted, irrigation set up and mulch added
Whew! We made it before the rain. Now, the test of patience before they bloom. Green plants will come up this spring. They may even have a bud or two on them. We will pinch them off. The goal is the get the best root system established before they really put a lot of energy into blooms. This will result in a much stronger plant. Since they can live for 30 years, it is important to give them a good start.
If you are growing peonies, I would love to hear how you care for them.
On the Farm - This is Columbine
As the weather is warming, we are beginning to see a shift in what is growing at the farm. The ranunculus and anemone are slowing down but the hardy annuals and the biennials are picking up steam. Next up is Columbine.
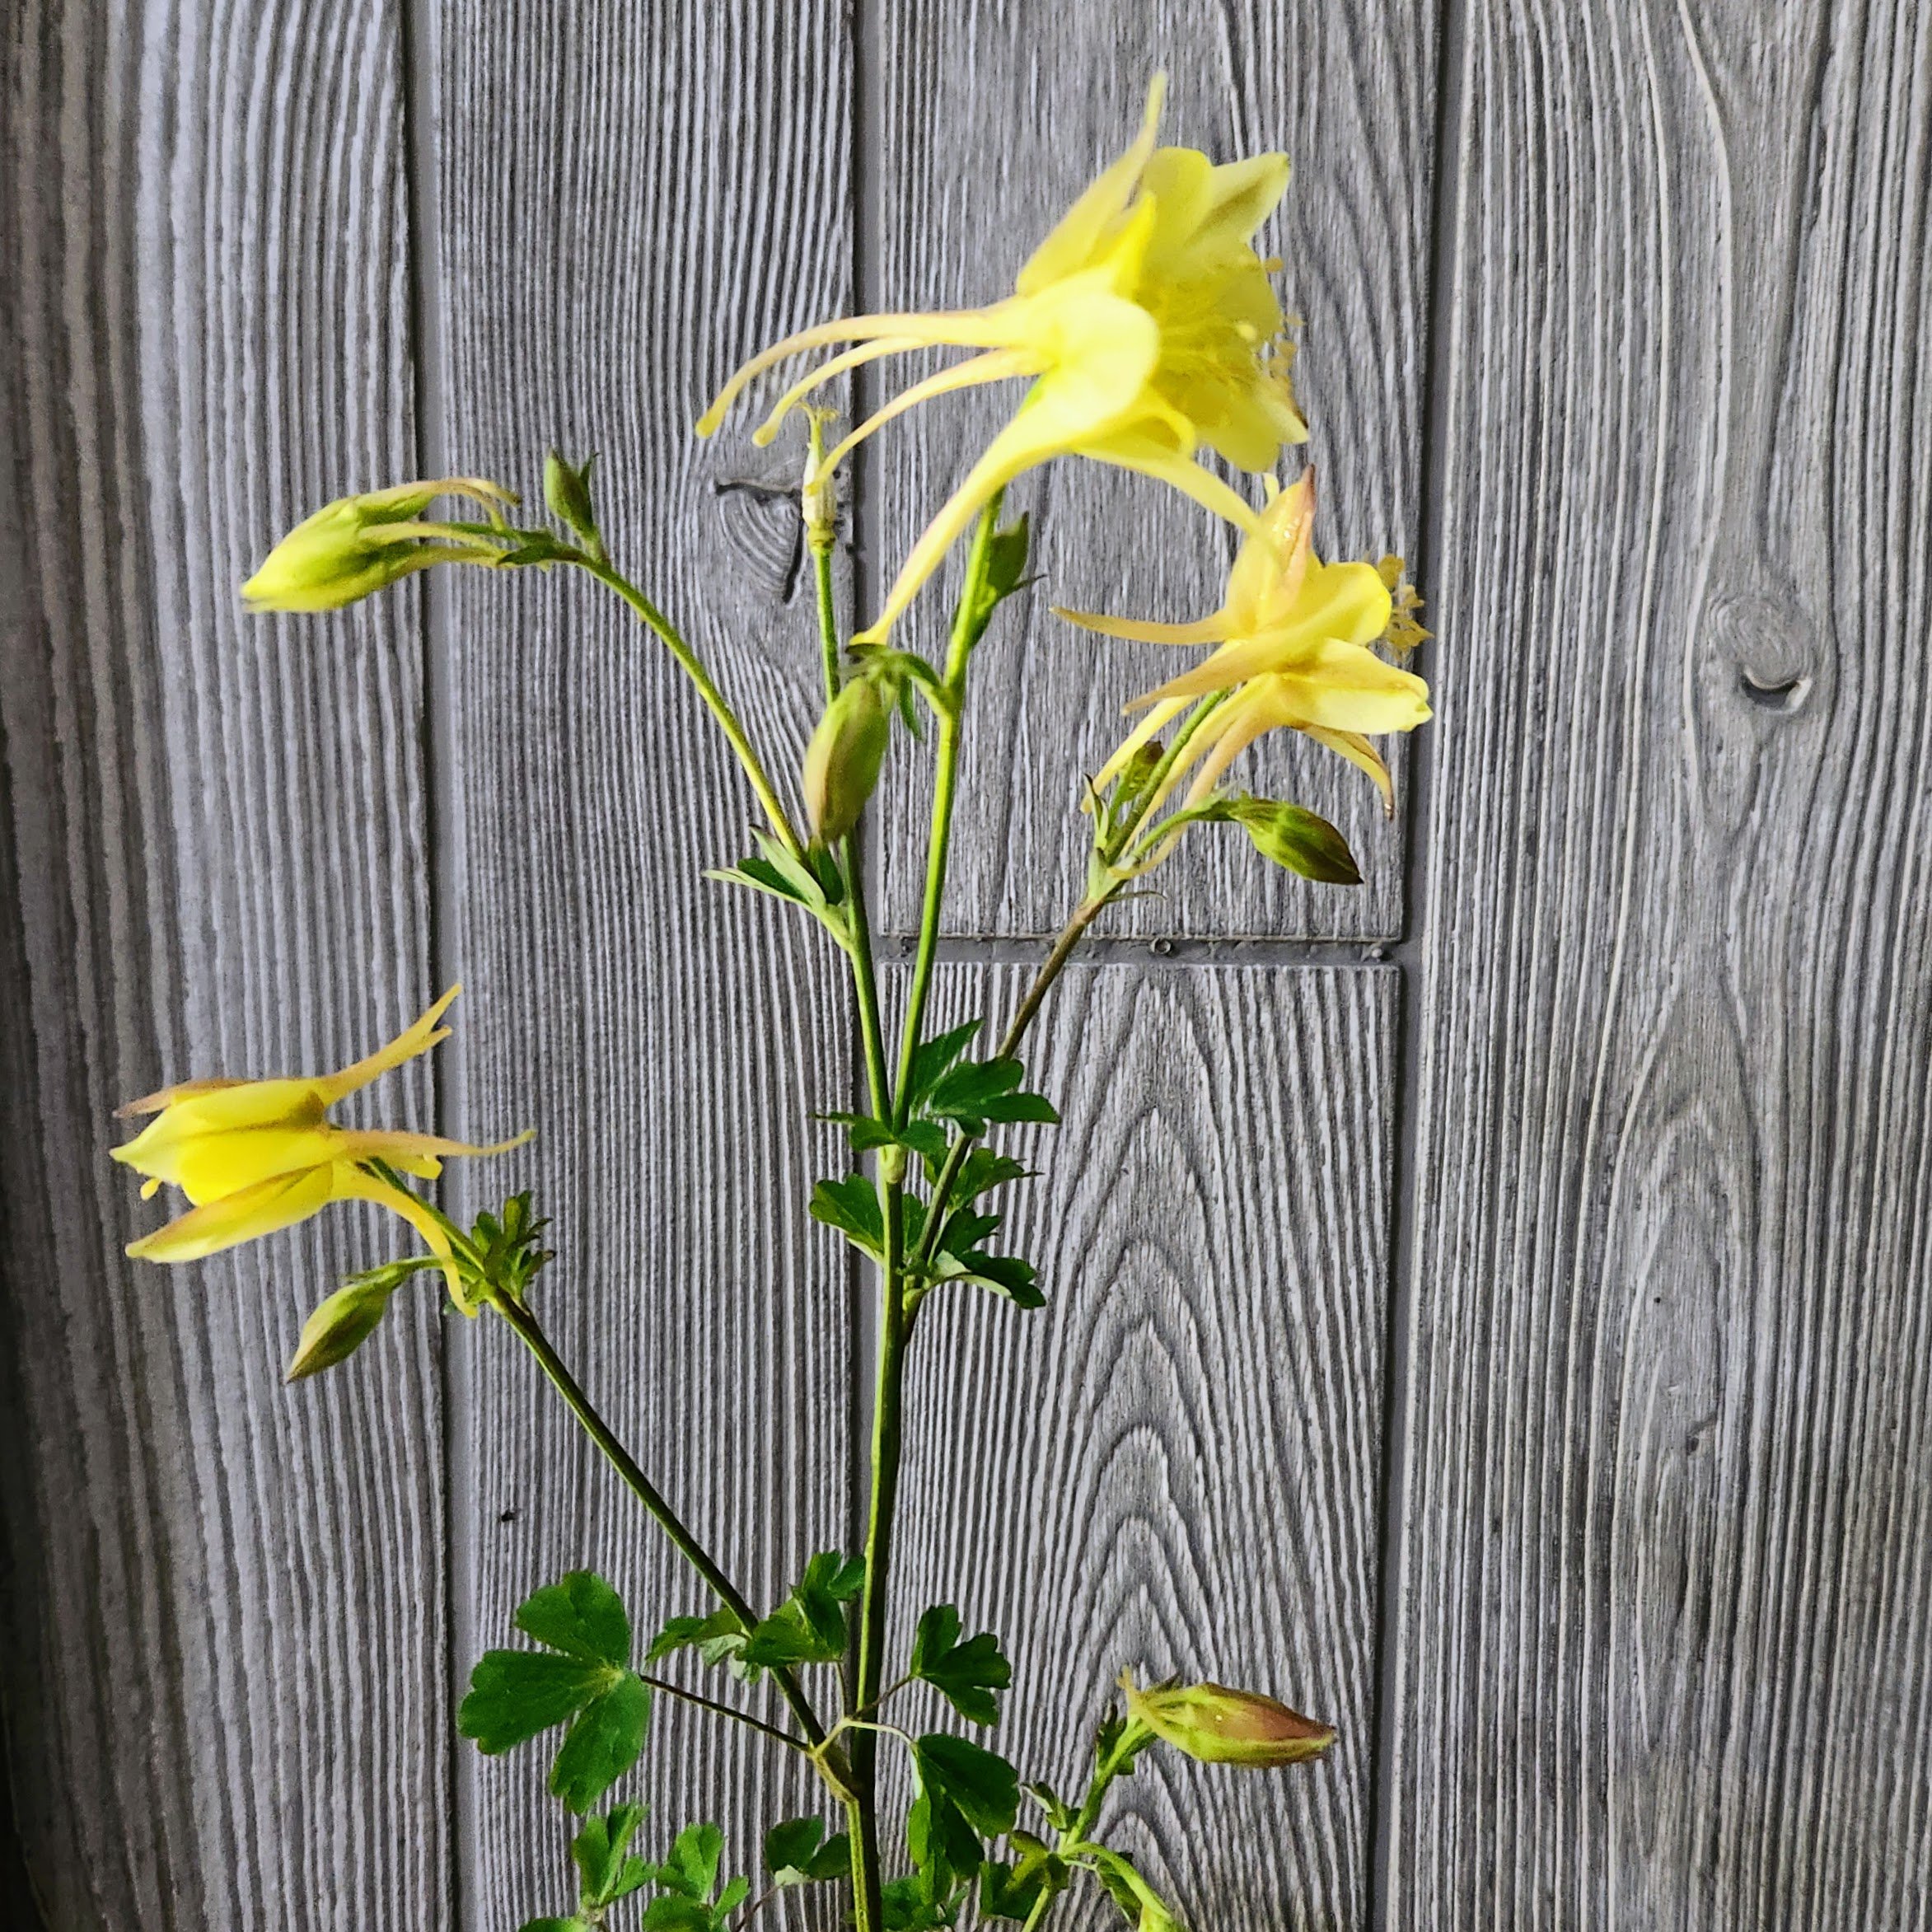

Columbine (Aquilegia spp) is technically a perennial but it is a short lived one, so we treat it more like a biennial. Biennials are a group of flowering plants that have a two-year life cycle. The first year, they develop their vegetative growth. The second year they produce flowers.
This bed of Columbine was planted two years ago. The green growth was very lush the first year. The second year, it produced minimal flowers on very healthy plants. This year, the third year, the stems are coming on strong, so we expect to see a good flush of blooms this year.
With the time involved to grow this and our shorter and shorter attention spans, I would not be surprised if you have never seen it. It is a really unique flower with its sculptural blooms. The bloom reminds me of a bird’s head.
We grow a long-stemmed variety that is suitable for cut flowers called McKana Giants Mix. It includes a mix of colors including blue, red and yellow. It can be grown from seed but we buy plugs (small started plants) to save time. I don’t recommend this for beginners since it doesn’t give the encouragement of fast blooms. For those who are seasoned gardeners, you may want to give it a try.
Happy Spring,
Linda
P.S. If you are ready to get your hands in the dirt, we have a few more beautiful lily bulbs available. Thanks to all who have already ordered. http://www.purpletuteur.com
Growing Lilies in the Midlands
March is a weather challenge for farmers and gardeners alike. Fluctuating temperatures keep us on our toes as we cover and uncover tender plants. While it is extra work, I don’t mind because we still have ranunculus, poppies and anemone until the daytime temperatures are consistently above 70.

In addition to the weather dance, we also plan and plant for summer. We start summer seeds and plant bulbs for summer between now and mid- April. Most varieties take about 90 days to bloom so we are starting things now that will bloom in June and July.
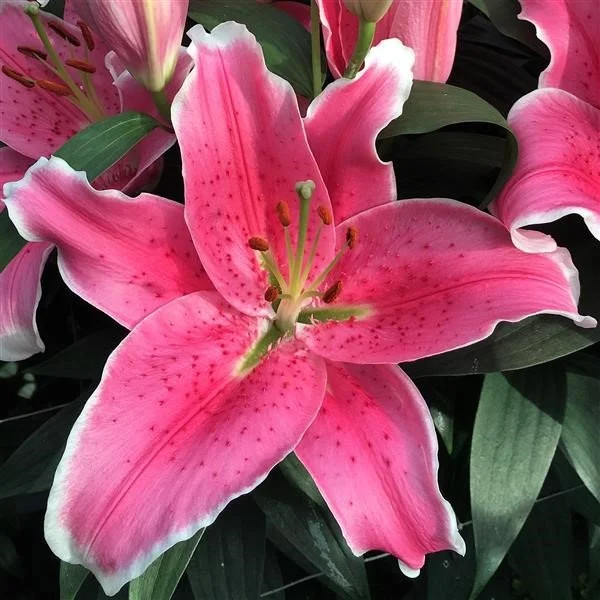
One garden favorite is lilies. We have a good selection of lilies this year and I am wondering if some of you would like to purchase some of these large Oriental bulbs for your own gardens. We have a limited supply to offer.
Growing Conditions for Lilies
Lilies are relatively easy to grow and make a great visual statement in the garden. Find a spot that is sheltered from the wind and has afternoon shade. They can also be very successfully grown in pots, allowing you to move them to the light or shade as needed.
As with all bulbs, they need soil that is rich and drains well so that they don’t rot. Plant them 8 – 12 inches apart in the garden or no more than 3 per 16” pot. Water regularly but not heavily. Plant them 3 times to a depth equal to three times the height of the bulb. Our warm climate favors a little deeper planting.
During the season, the lily plants will get tall. You can stake them or plant them between shrubs that will provide support. Blooms can be left in the garden to admire or cut to bring into the house to enjoy. After bloom, remove any spent flowers and slow the watering. Leave the stalks to do their photosynthesis activity and strengthen the bulb for next year’s blooms. The stalks can be removed when they are brown.
Early each spring, side dress the bulbs with a balanced fertilizer. Mulch the plants with a light layer of leaves or compost.
Bulb Sale Information
In order to encourage people to get them planted at the optimal time, we are going to limit the window of the sale to two weeks. We will be posting the information on our website starting on Friday 3/24 until Friday 4/7. You will be able to order for pick up or local delivery if you are interested. (Sorry, we are not shipping yet but getting closer). These bulbs should be planted as soon as they are received, for bloom in late June or July. These are varieties that will bloom for years to come in your garden.
Here are the three varieties that we will be offering. Do you have other favorites?

Zelmyra

Tigermoon
Pink Zsar
There is more information about these and other spring bulbs on our website, www.purpletuteur.com.
Happy Spring!
Linda
Perennial Phlox

Does your garden have too much sun for Hydrangeas? You may want to try perennial Phlox, Phlox Paniculata. The bloom has a shape that is similar to a hydrangea. They bloom this time of year and are available in a variety of colors. Be sure to select one that is resistant to powdery mildew and you are good to go!
These plants grow tall, with 2 – 4 foot stems, so find a spot in the back of your sunny bed. If you cut them to bring inside, cut the stem near the base of the plant. Often, a second smaller flush will come up before the season ends. As with many perennials, they die back to the ground over the winter. Green shoots start up early in spring.
If you have a bouquet subscription with us, you will see Phlox in the next bouquet. We grow David’s Lavender. In the garden the bloom is pink. When we put it into the cooler it turns purple. When it warms back up, it turns pink again. No other varieties have this chameleon-like characteristic.
Do you grow perennial Phlox in your garden? What is your favorite variety?
Other News:
Thanks to all of you who came to the farm for the Ag+Art Tour. We had between 250 and 300 visitors this year. We appreciate being able to share what we do and what the artisans do during this event.
Wishing you much joy in the abundance of summer!
Linda
The Kousa Dogwood
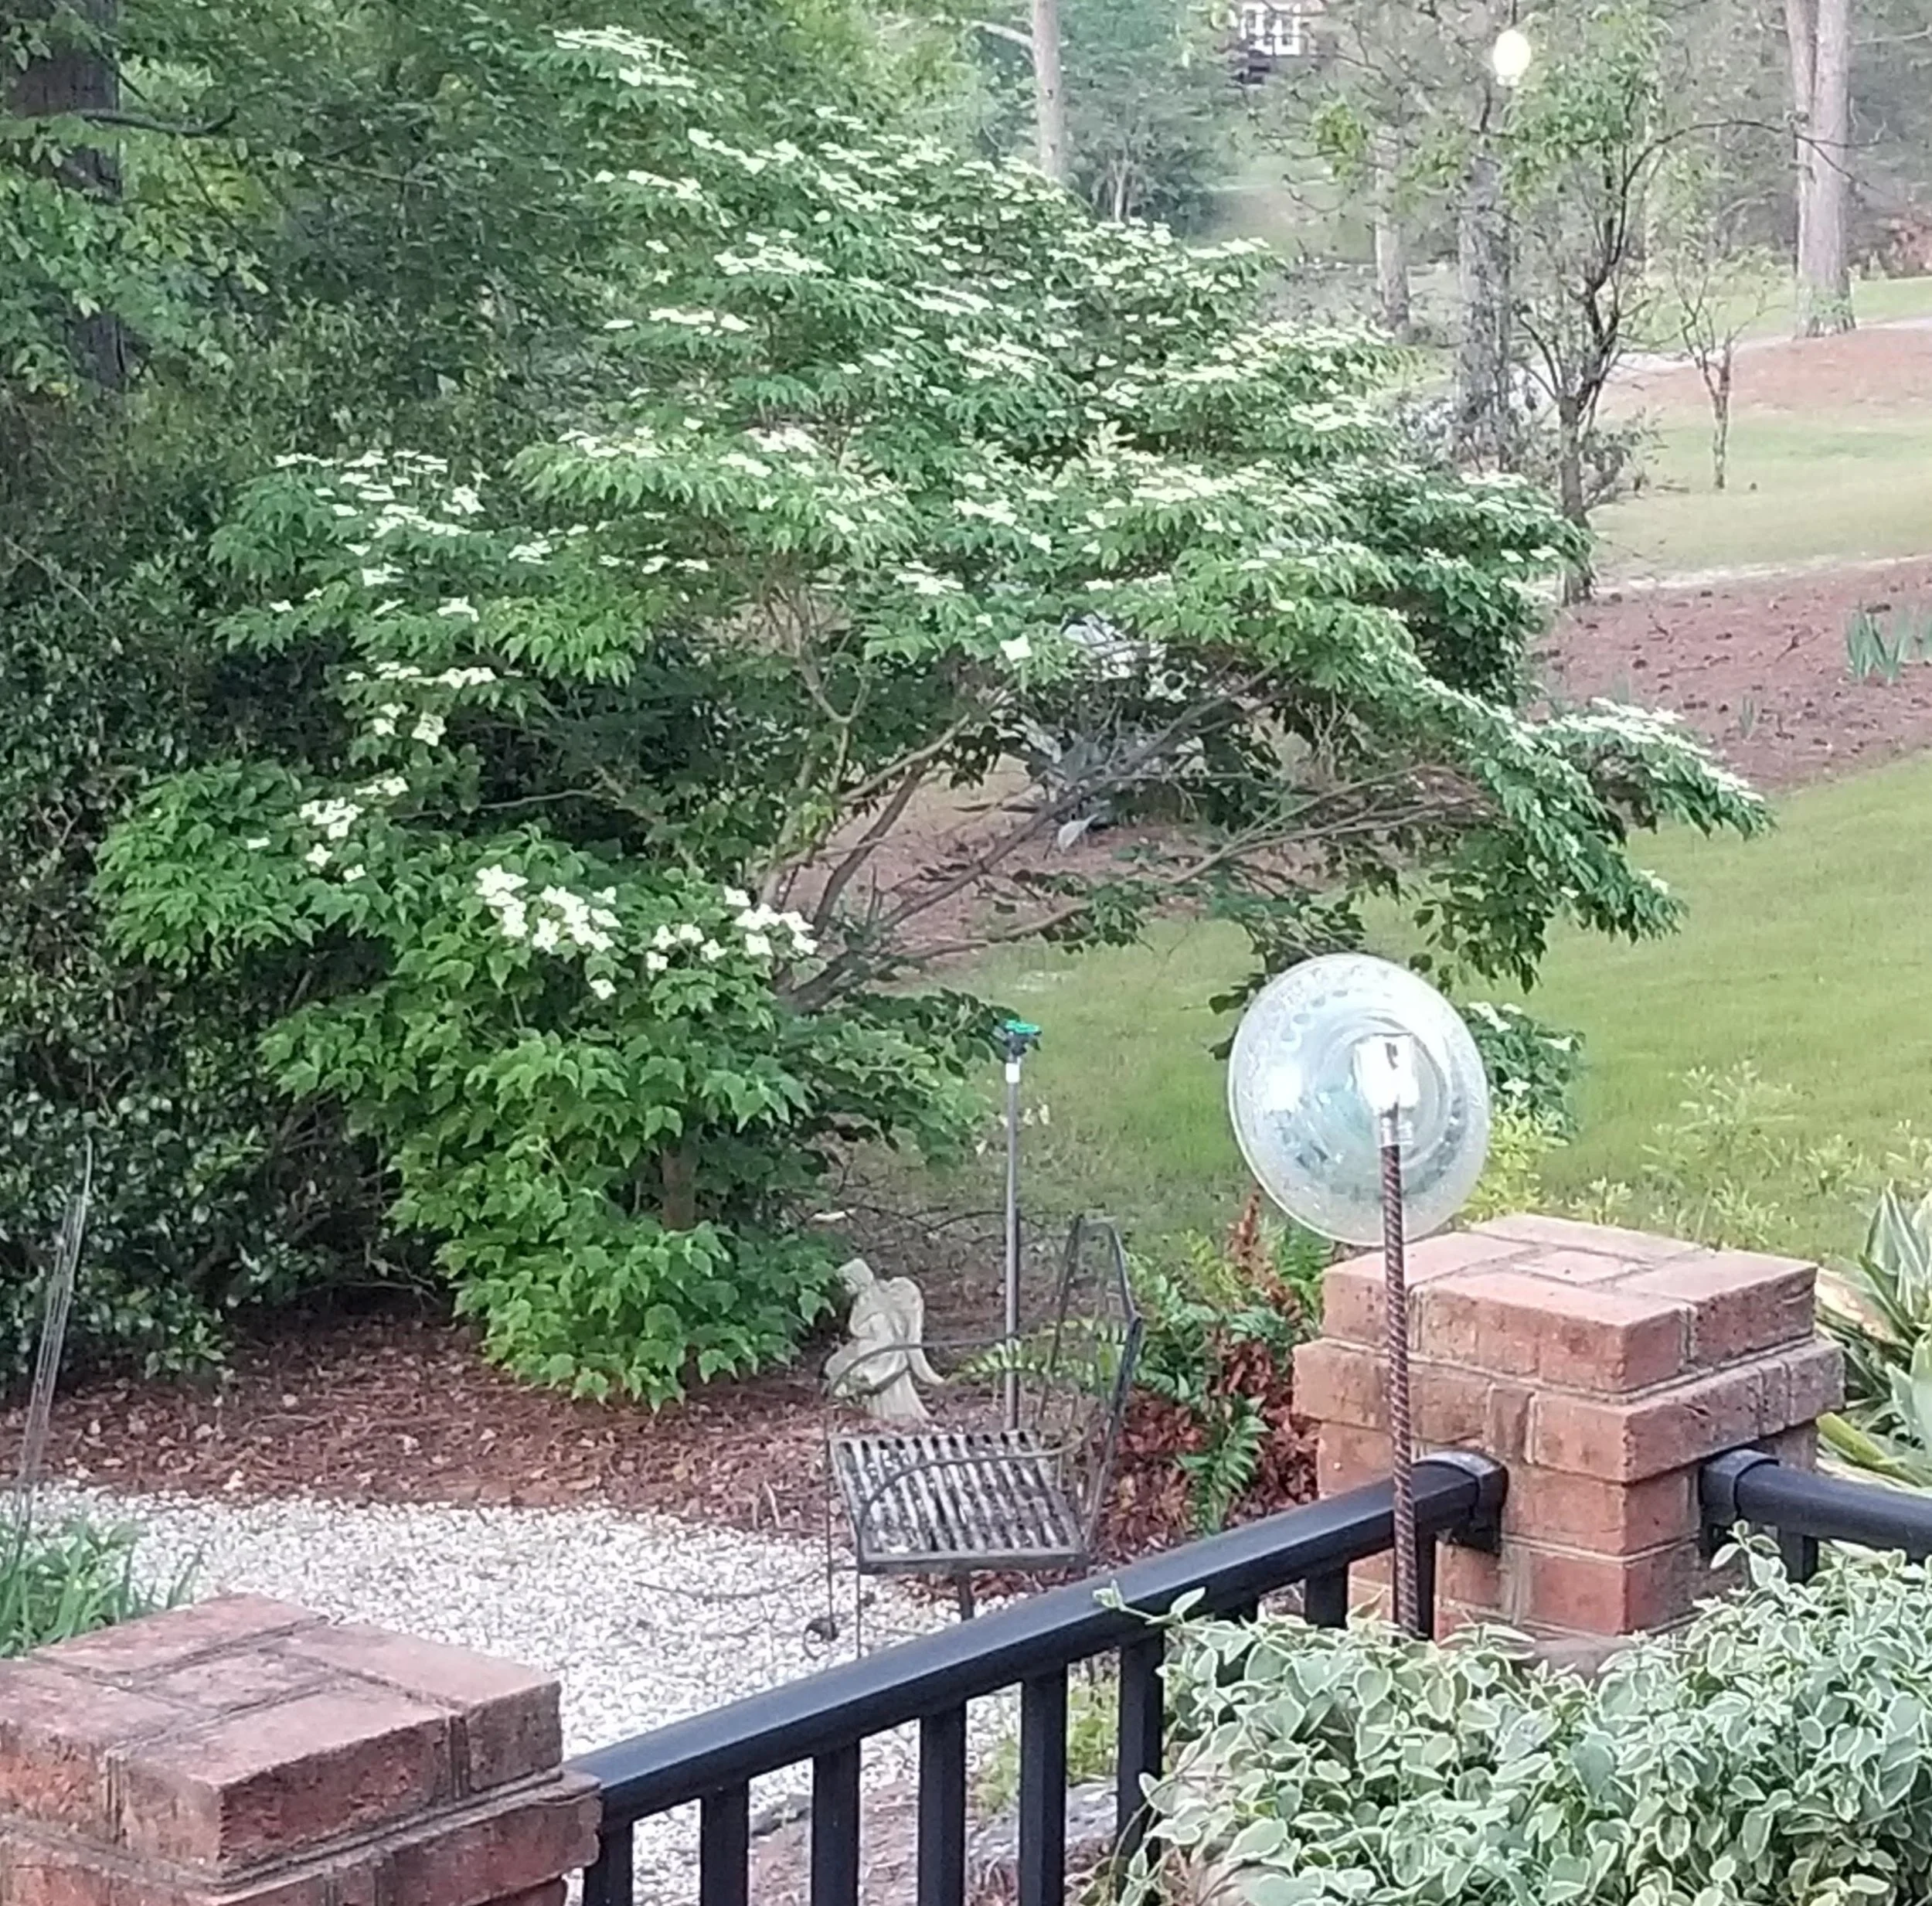
Our cousin Susie brought us a Kousa Dogwood the year our mothers passed away. She told us that it would be in bloom on Mother’s Day and I looked forward to seeing it flower. The year was 2006.
The young sapling came in a nursery pot and was about 3 feet tall. This was a good size to plant, as I could dig a reasonably small hole and get it settled in.
I found a spot in our back yard, in partial shade, where it could be somewhat protected and got it planted. After giving it a deep watering, I made a mental note to check on it again periodically, but especially on Mother’s Day.
The next year, the tree had grown but there was not much flowering. It needed more time to get to its mature state and flower. In the following years, we saw just a few blooms.
Last fall, we had some aging pines cut down. They were at risk of falling on our house or on our neighbor’s place. This past winter, we had high winds and lots of cold and several other shrubs fell in the same area. This all happened near the dogwood, which remained unaffected.
We have a hole in the landscape now that needs to be filled. I am excited to be able to select some new trees and shrubs for the ‘privacy fence’ between us and the neighbors. I am looking at flowering shrubs like Weigela, Viburnum and Cotinus. This, however, is not the most exciting thing.
The Kousa is blooming! It has bloomed this year like it never has before. Letting more light in made it explode with graceful white flowers. These proper growing conditions should allow it to get taller and stronger going forward. It is thriving and in full bloom this Mother’s Day week. The happy memories of our mothers and times spent in their loving care are represented in each and every bloom.
Wishing you all a Happy Mother’s Day. Whether they are here or are gone, may the light of their love be with you.
Want Your Amaryllis to Rebloom for The Holidays? Start now!
Now that school is back in session and the weather is beginning to cool off, it won’t be a minute before the holidays are upon us. Now is the time to do what is needed to get your amaryllis ready for their show.
Amaryllis need a dormant period to build that bloom inside the bulb. We can easily facilitate it by taking just a few simple steps now and a little prep closer to the holidays.

1. Bring your bulb in from outside or away from the window and let the soil dry out for a couple of days. The leaves should be long and green, from a season of green growth, helping the plant absorb solar energy. In this example, a new bulb has formed. Cut its leaves too. It may need another year before it is big enough to bloom.

2. After the soil is dry to the touch, cut the leaves to within an inch of the bulb. After the cut, store the bulb for 8 to 12 weeks somewhere dark and cool, preferably at 50 F. Do not freeze the bulb and do not water it. No water at all for the 8 to 12 weeks.
That’s it until 8-12 weeks from now! Simple, right? Now mark you calendar for the date you plan to take the bulb out of dormancy, to remind you to do it.
Then What?

When you take your bulb out of the dark, refresh the potting soil and add a little bulb food to the soil. You may have to stuff the roots back into the pot, but that’s OK. They like being pot bound. Remember to leave one third of the bulb exposed.
Give it a good deep watering. Put it in a warm sunny place. Do not water it again until you see new green growth.
Once the new growth has started, water when the soil dries out. In a few weeks, buds will push out of the bulb and the bloom cycle begins again!
Top Tips for Growing Peonies in the South
We all have certain flowers that connect us to happy memories. Peonies do that for me, so naturally I wanted to grow them on the farm. In our hot and humid climate, I tried a couple of times with limited success. Perseverance pays off and we have 3-year-old plants on the verge of blooming for the first time!

Here are a few tips for growing peonies here in the Midlands:
1. Peonies are expensive to purchase but they will live a very long time. Many people have told me that they have dug up the plants from their grandparent’s house and moved them to their own yard. For our climate, select early season varieties. They need to bloom before the heat really sets in.
2. Grow them in a raised bed or a pot. They need to be exposed to as much cold air as possible. Something above ground will stay cooler.
3. Put them in full sun. They need sun to bloom well.
4. They need a mixture of soil, minerals and compost. Mushroom compost is recommended since many other types of compost include pine bark and it carries something in it that makes peonies more vulnerable to disease.

5. Bare roots are the best value. Find the biggest ones with the most eyes. Plant them so that the tops are just one inch below the surface. If they are planted too deeply, they won’t bloom since this insulates them from the cold. In colder climates, they are planted deeper.
6. If you purchase bare roots, expect to wait three years for flowers. They will not have any blooms the first year. They need their energy to develop a good root system. The second year, they may have some blooms but it is recommended that you deadhead them so that they can continue to focus on their roots. The third year will bring on the flowers.
7. There are potted plants available at some of the local nurseries. These are good too but the selection is more limited. Expect to have a transition year in your garden if you plant a potted plant. They may need a year to adjust and you may not have blooms the first year so don’t give up.
8. Each year add a thin layer of compost and some minerals (I use Azomite) to nourish them. Don’t put down a thick layer because you don’t want to bury the tuber.
9. After the bloom period, I put some shade over them so that the foliage stays healthy longer, providing more energy for next year. Expect the foliage to look ratty after the heat sets in. Everyone’s plants look less than lovely.
10. When you do cut the foliage back, don’t put it in your compost pile. Throw it away as it may carry disease.
What tips do you have on growing peonies? I would love to hear them!

If you want to order from a specialty nursery, I highly recommend Peony’s Envy (https://peonysenvy.com). They are so helpful and they have a great deal of information on their website if you want more education on these beauties.
We will be including our peonies in our subscriptions while they last. We still have a few Spring to Summer spaces available. Sign up at https://www.purpletuteur.com/subscription-information.
Happy Gardening!
These are Amaryllis and Delphinium
Doubling up now since the season is changing and soon many new flowers will be showing up in the bouquets!
This is Amaryllis
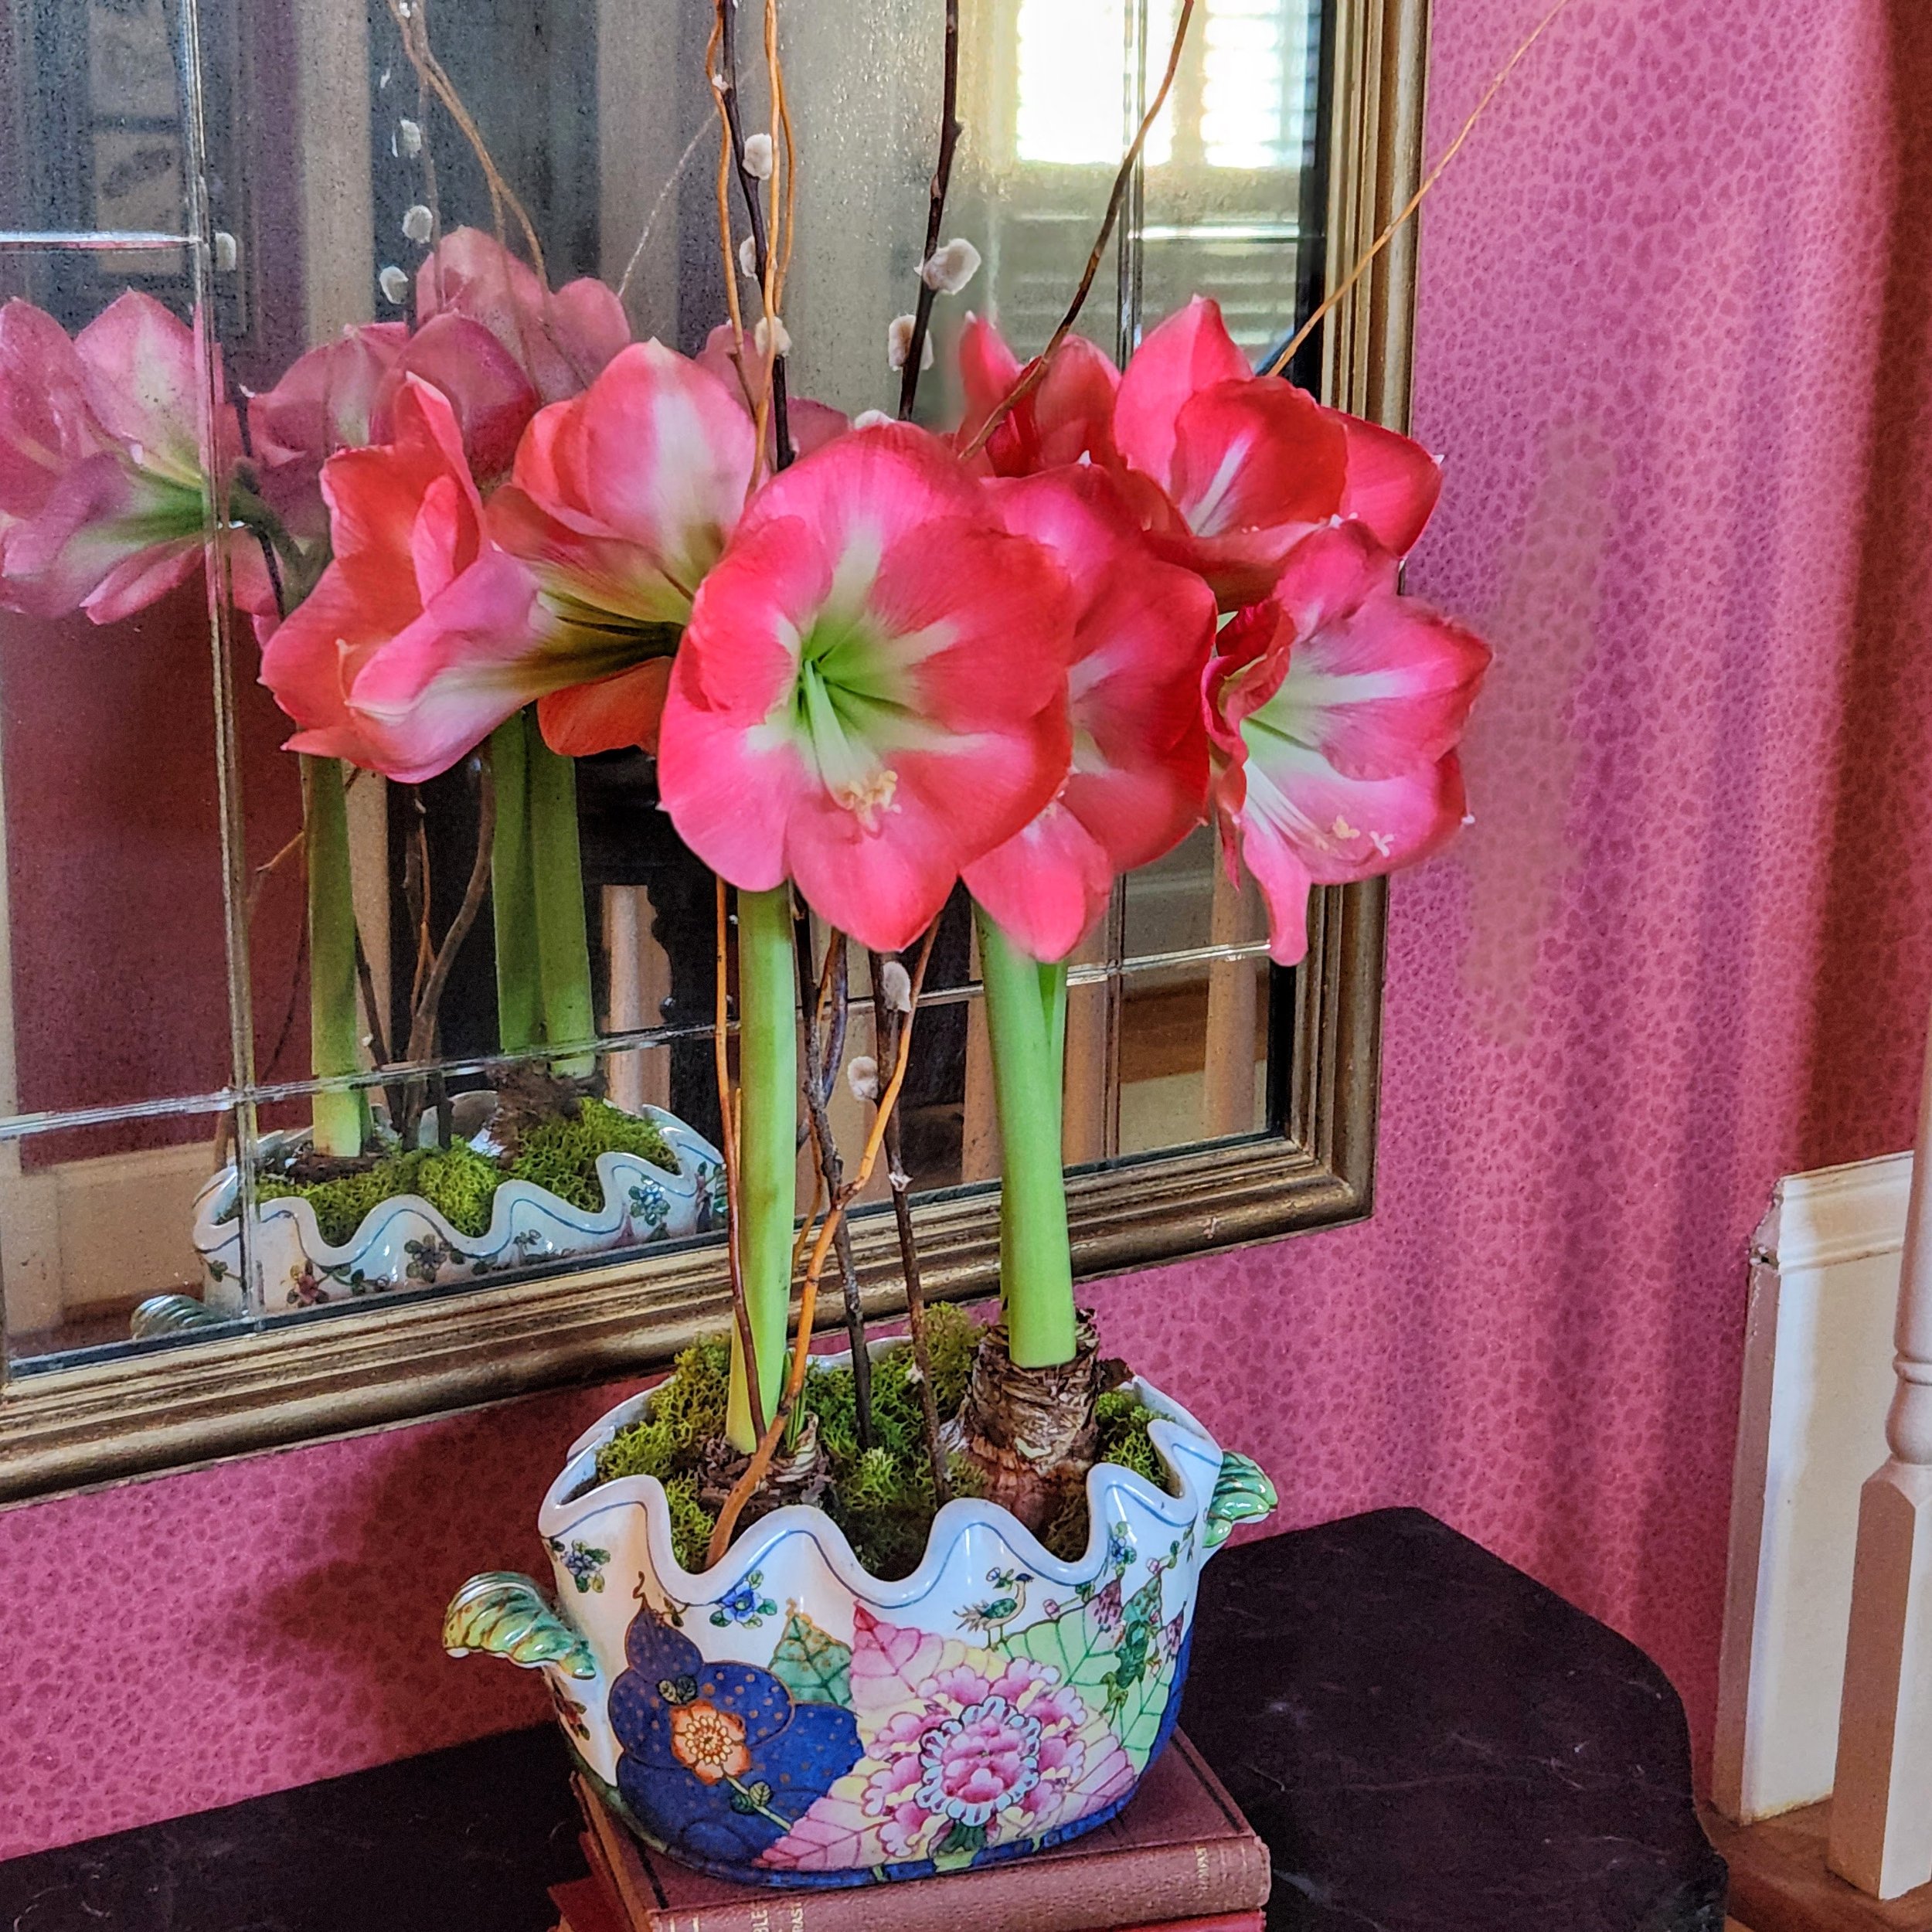
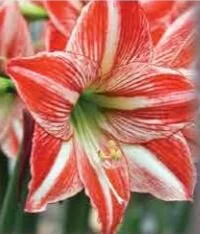
Amaryllis is something that most of us are familiar with for the Christmas holidays. At that time of year, they are most often red, white or a combination of both. Beyond the traditional, amaryllis come in many colors and some alternative flower shapes as well. They make an excellent, long lasting cut flower.
We grow them just as you do for the holidays: indoors in a warm climate. See our blog post on how to grow them here. This year for bouquet season, we have used hot pink, white, burgundy and red striped varieties. They also come in green, orange and yellow. We will probably try some of those as well in the future!

This is Delphinium
Delphinium is actually a whole genus of plants but what we use specifically is the Guardian variety. The colors are gorgeous shades of blue and white. We grow these from plugs (baby plants grown in a greenhouse) since they are difficult to germinate. As they require cooler temperatures to grow well, we plant these in the fall. They overwinter in the garden and break out into bloom in early spring.
There are other great varieties to grow. Belladonna has more of a spray growth habit and is also nice for cutting. Pacific Giant is the same shape as the Guardian but much taller. These are well suited for the back of the garden border where they add height and drama. Probably too tall for bouquets.
In some areas delphiniums are perennial but we treat them as annuals since they typically can’t make it through our “famously hot” summers. They are repeat bloomers, so when you cut them, cut close to the ground. The stems start off a little short and get longer with each cutting.


Our spring season subscriptions are winding down. If you missed them and want farm fresh flowers delivered to your home or business we still have openings for our spring to summer subscriptions. For more information, see our website at : https://www.purpletuteur.com/subscription-information
Happy flowering,
Linda
This is Ranunculus
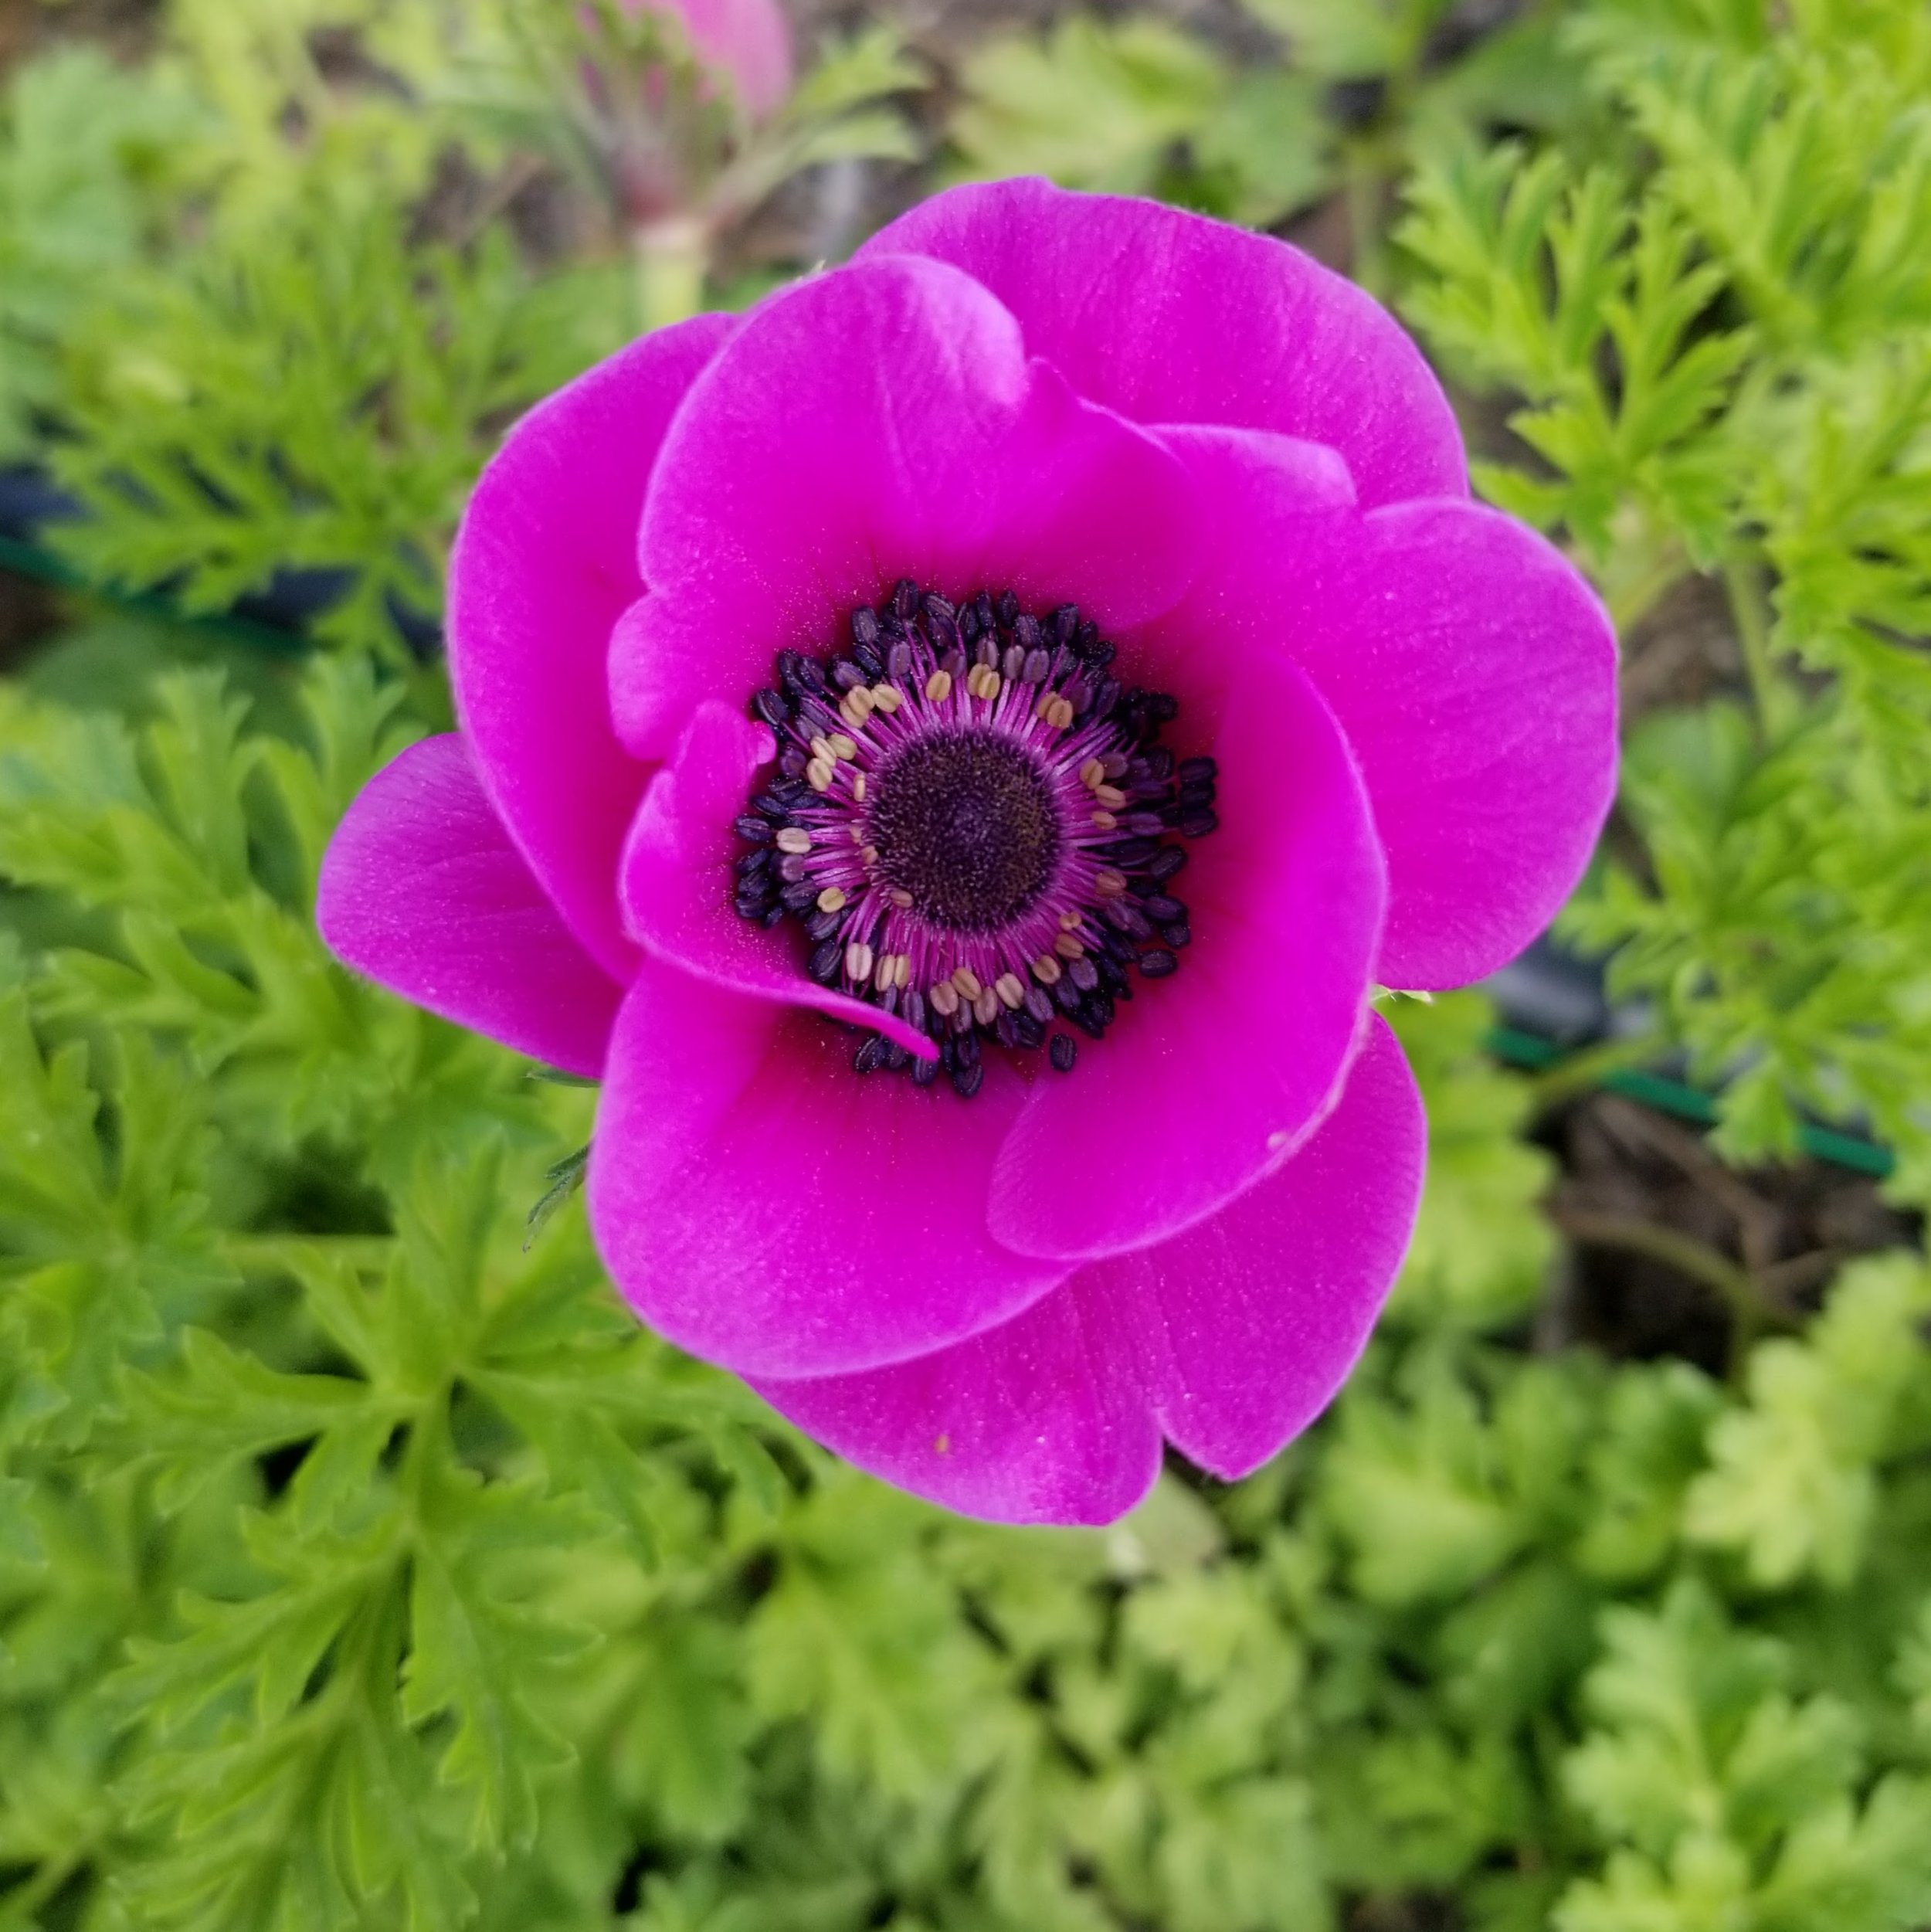
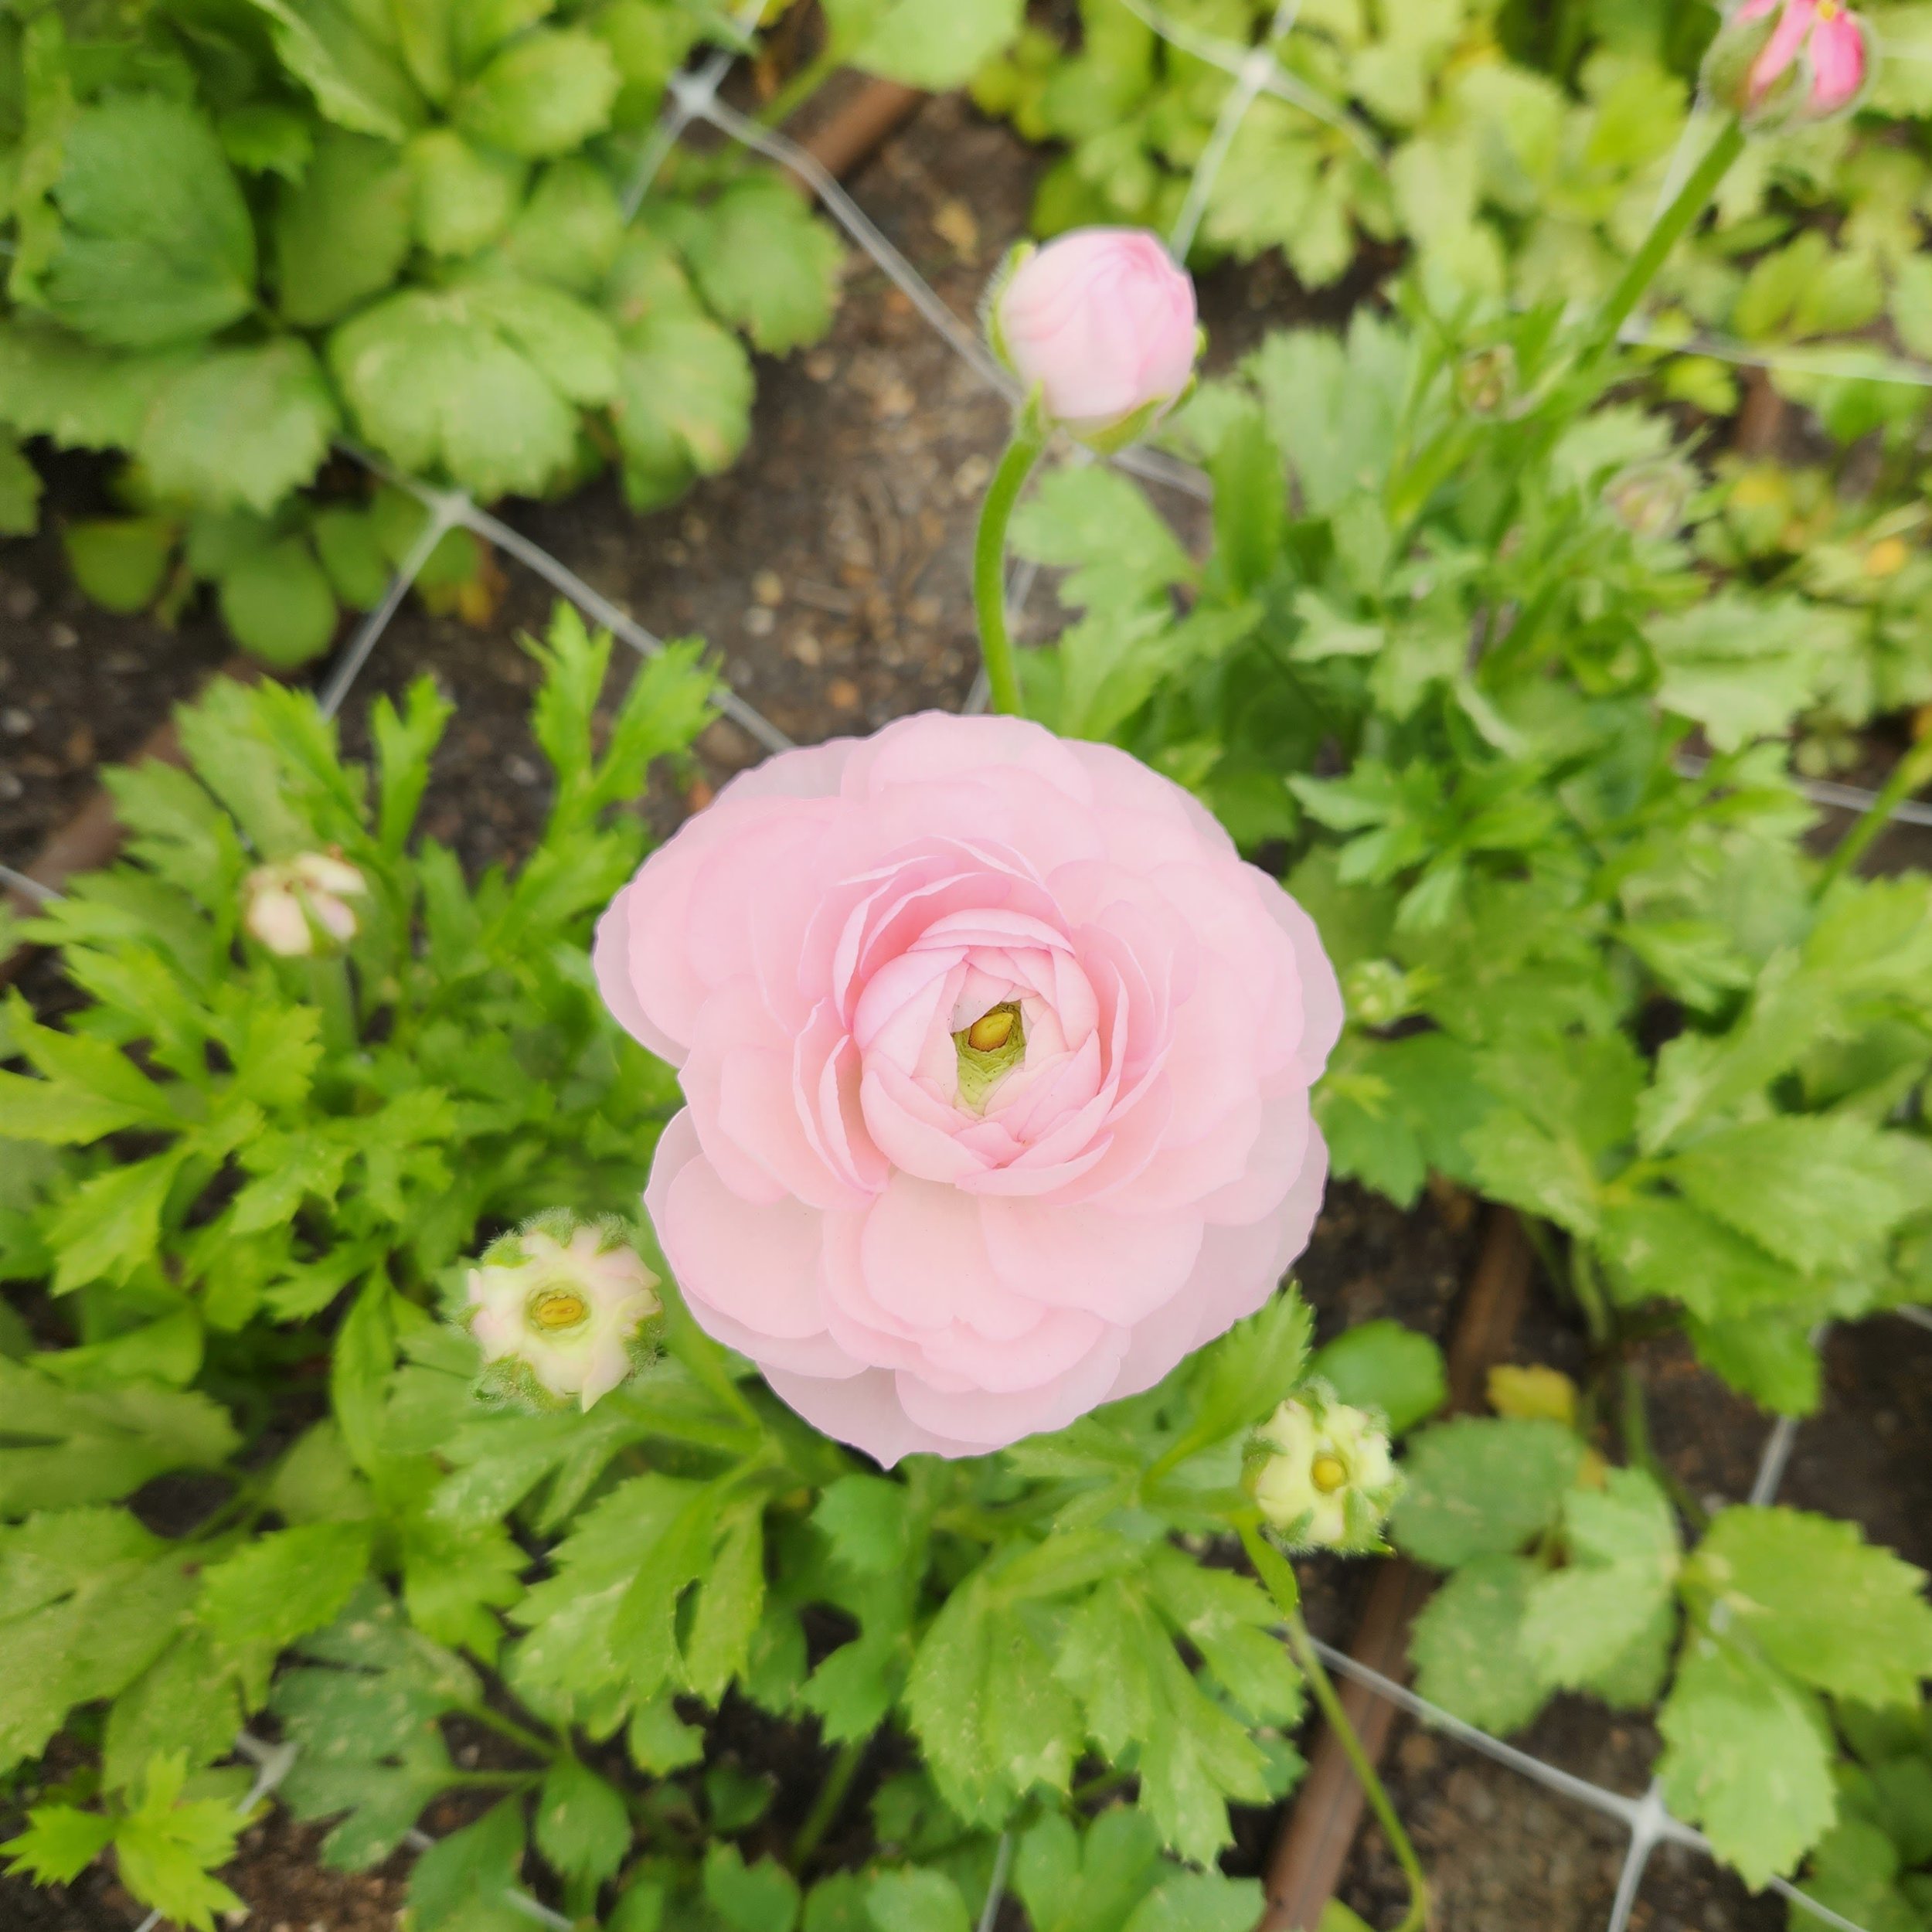
Ranunculus (Anemone Coronaria) is commonly known as Buttercup. The corms (bulbs) come in yellow, orange, pink, red and white. Known as the “rose of spring”, the flower is shaped like a rose.
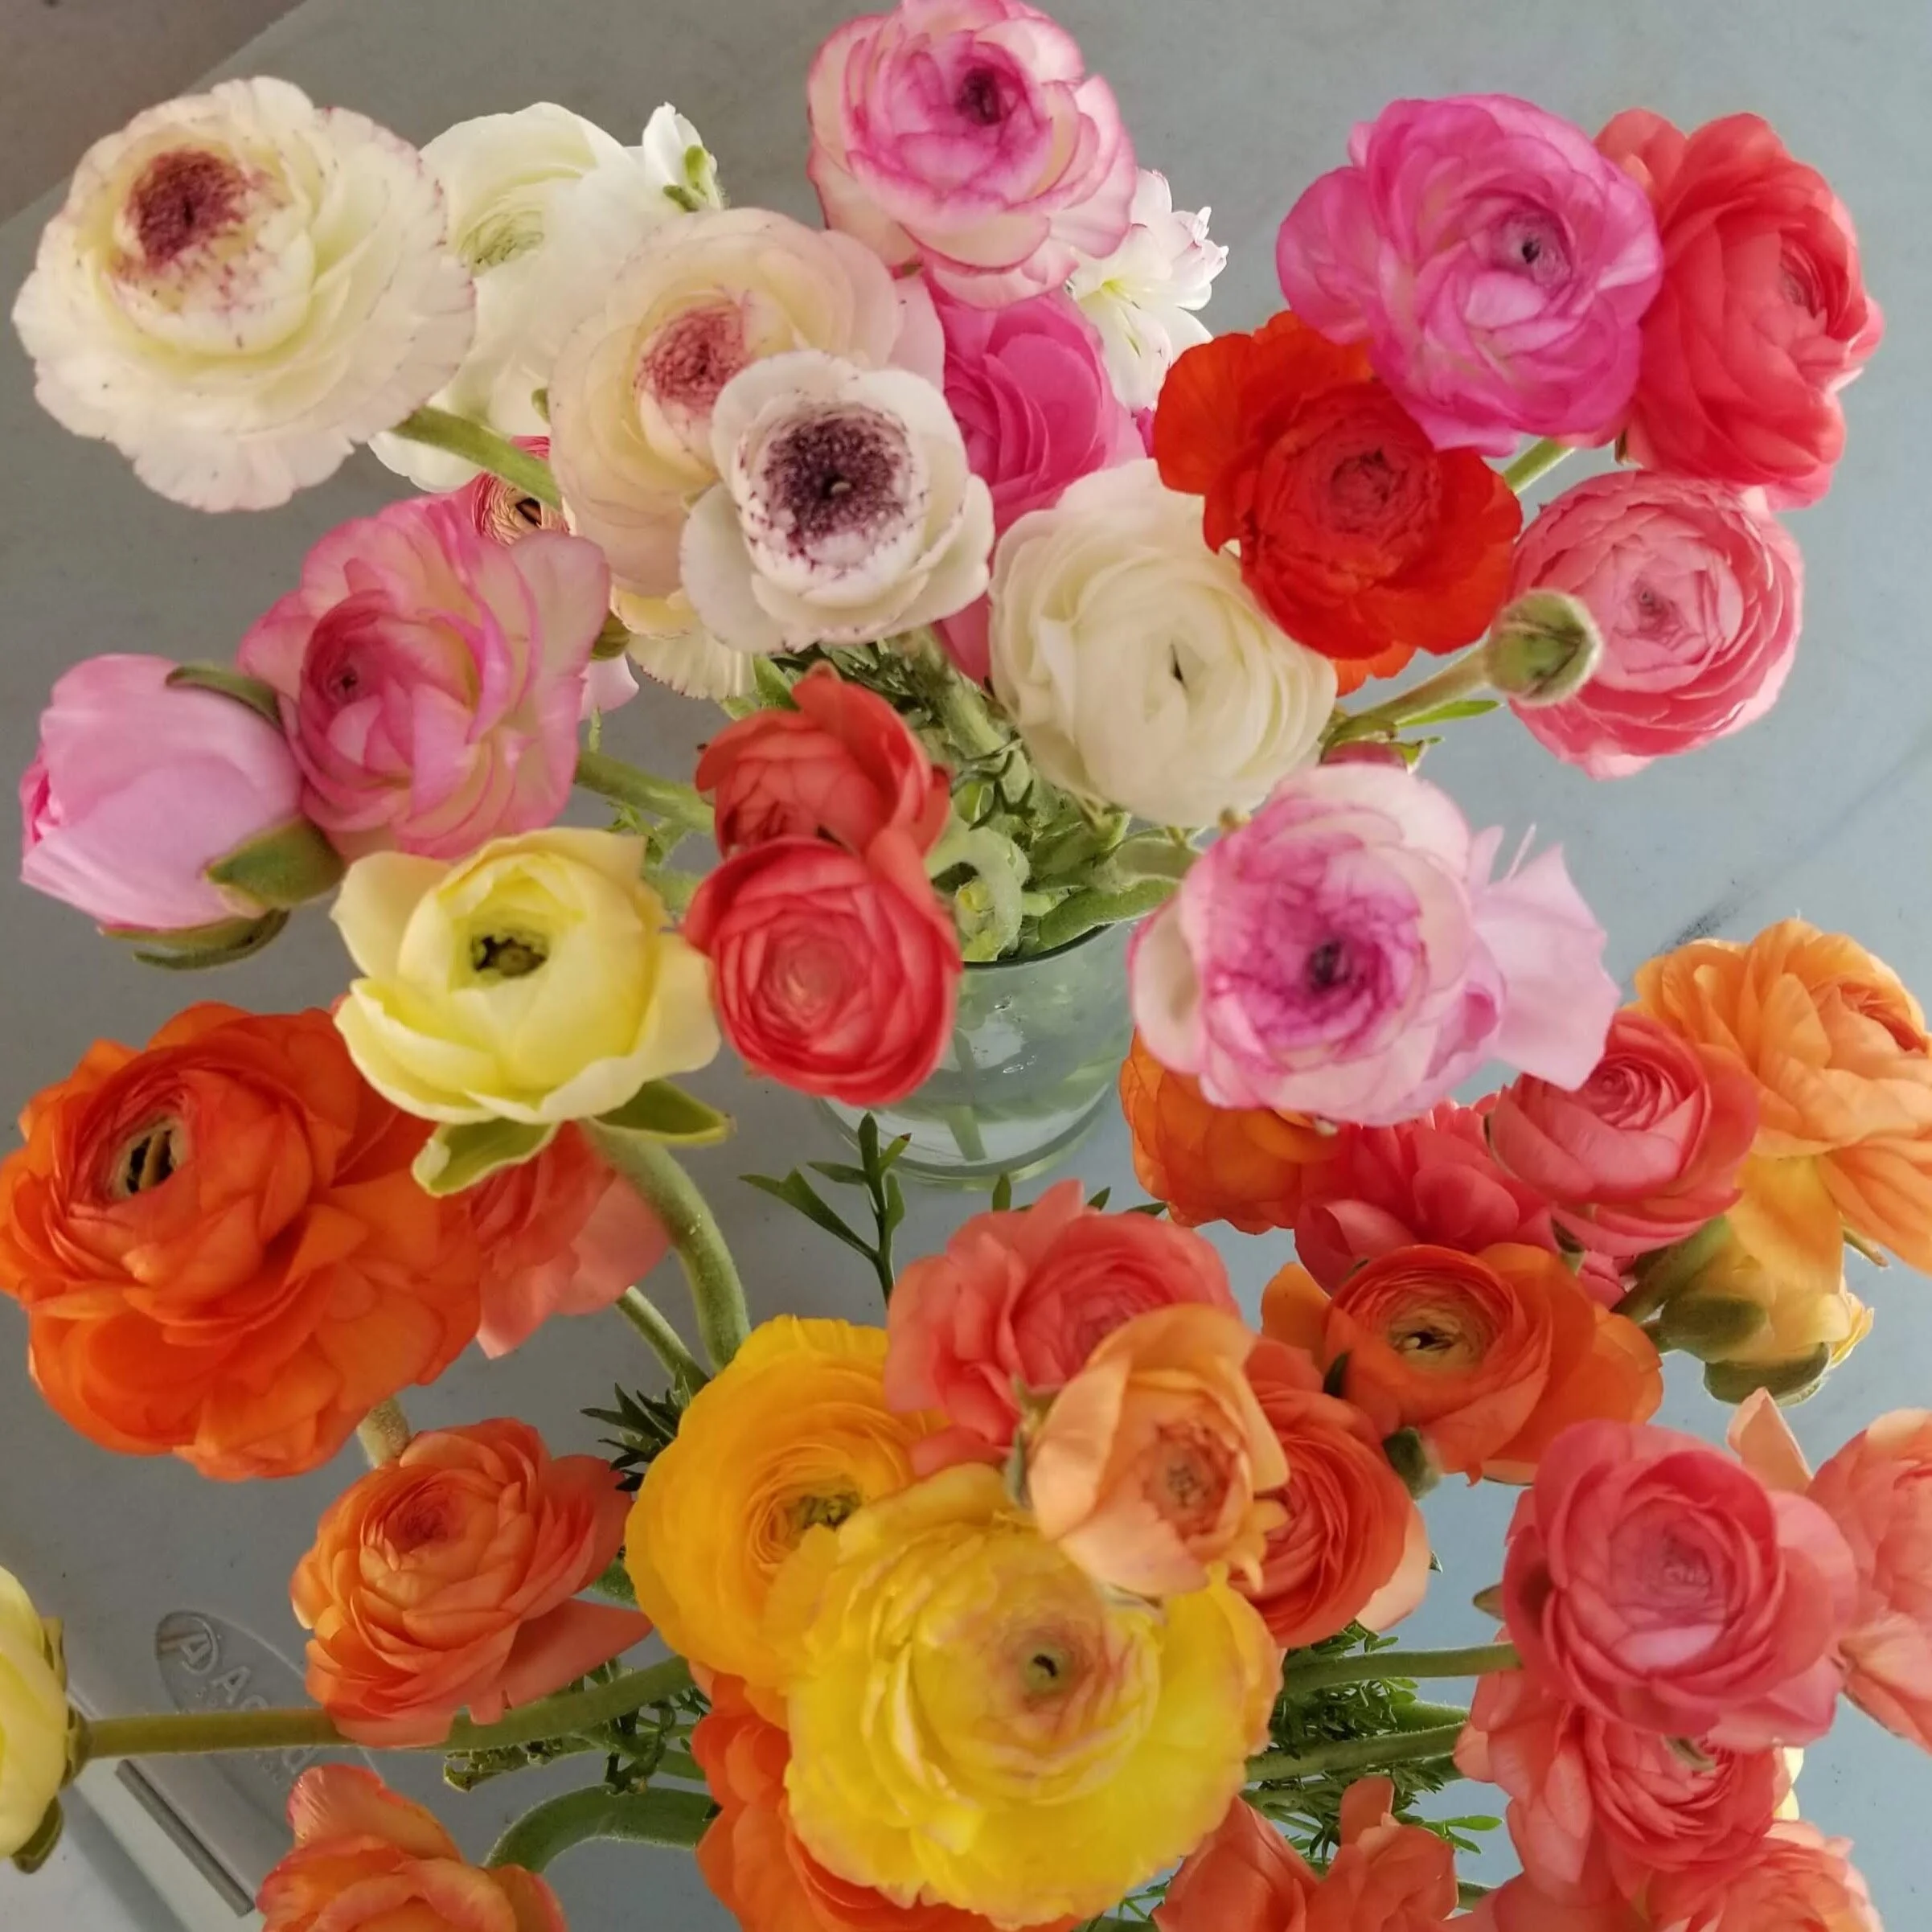

Ranunculus starts blooming in mid-March in Columbia. If you want to add them to your garden, they are a perfect partner to anemone. The growing conditions are the same. The ranunculus corms can survive our winters in the ground. They do best when the daytime temps are in the mid-60’s and the nights are in the 40’s. They will keep blooming until the daytime temps are consistently in the 70’s. After the heat comes on, they fade away until November or so. Then they green up and take up the sun until the March blooms appear.
Ranunculus blooms need protection from the rain. Each plant will bloom several times while in season, so even if a flower gets drenched, all is not lost. Just deadhead it and wait for the next one.

In addition to these there is a variety known as butterfly ranunculus. These are more of a spray form and the flowers have wax coated petals that give them a shimmer. They come in soft pinks, yellows and a pale salmon color (pictured). From Italy, these are fairly new to the United States. Only two wholesalers can distribute them here which makes them more expensive. We are growing some for the first time this year and experiencing some problems but still hopeful that some will make it into spring bouquets.
There is a proper time to cut every flower in order to maximize its vase life. For ranunculus, the right time is when the flower petals are barely open. When properly cut, they will last a good week in a vase.
What do you think of ranunculus?
Thanks to all of you who have ordered your subscriptions. Although the spring season is sold out, we still have some available for the spring to summer season. You can sign up on our website, www.purpletuteur.com.
As always, we appreciate all the love and support you show us here at our farm. It keeps us motivated to try and bring you the best and most beautiful blooms.
Many thanks,
Linda
This is Anemone
We are about a week away from getting enough blooms to begin delivery! Thanks to all who have signed up. We have just a couple of spots left for Friday delivery for the early spring season.
This is the first in a series of blogs introducing some of the flowers we grow.


Anemone (Anemone Coronaria) is a late winter/early spring bloomer for us in Columbia. The corms (bulbs) come in many colors and in single double flower forms. In addition to the longer stemmed varieties that we use for cut flowers, there are short-stemmed versions that are nice to have in the garden.
All types can survive our winters in the ground but the flowers don’t do well in the rain. If you don’t have time to be concerned about every bloom, you simply dead head those that have gotten wet. Otherwise, you can grow them under cover to protect them from our wet spring weather. Each plant will bloom several times while “in season”, so even if a flower gets drenched, all is not lost.
Anemone does best when the daytime temps are in the mid-60’s and the nights are in the 40’s. This translates to March for us. They will keep blooming until the daytime temps are consistently in the 70’s. After the heat comes on, they fade away until November or so. Then they green up and take up the sun until the March blooms.
There is a proper time to cut every flower in order to maximize its vase life. For Anemones, the right time is when the collar under the bloom is about a half an inch from the base of the bloom. They may wilt if you cut them sooner. When properly cut, they will last a good week in a vase.
If you are thinking that you knew of anemone as another flower, you are right. There is a shrub-like perennial called Japanese Anemone (Anemone hupehensis). The blooms look very similar to the bulb form but they bloom in a spray in the fall. This is why botanists revert to Latin names for flowers. Many common names apply to multiple plants but each has its own unique Latin name.
What do you think of this flower? Have you grown it? Is there another flower that you like to see this time of year?
I hope you are as excited for Spring as I am!
Best,
Linda
Amaryllis and Paperwhites
It’s November and Christmas is seven weeks away. While there is still plenty of time for shopping and baking, if you would like to have amaryllis and paperwhite blooms for the holidays, it is time to get started.
Ednie Photo
Amaryllis take 6 – 8 weeks to bloom, depending on the variety. Once you get them potted up, put them in a low light location for the first week to ten days so that the roots get well established first. Then move them to more indirect light as the stems begin to emerge from the bulb. Remember to turn the pot occasionally so that the stems stay straight.
Did you know that amaryllis bulbs already contain the flower/flowers that will emerge? This is one key reason why bulb size matters. Larger bulbs produce more stems and more flowers per stem.
Amaryllis bulbs make wonderful gifts. They stay dormant until they are potted up and watered. One year I gave amaryllis forcing kits to a group of friends at the holidays. Not only did I enjoy growing one myself, but everyone I gave them to sent me pictures of theirs in bloom. It was a fun thing to see after the holiday season was over and the excitement shared in the pictures made me sure that they really enjoyed them.

Ednie Photo
Paperwhites are the instant gratification bulb of the season. Paperwhites need only 3 – 5 weeks to bloom. 3-week bulbs can give you blooms for Thanksgiving if you get started soon. As with amaryllis, bigger bulbs produce bigger and more abundant flowers.
There are many new varieties of paperwhites. Most of what you see in the retail stores is a variety called Ziva and they have a very strong scent. This variety has put paperwhites out of favor with many people. New varieties have milder scents and are more colorful.
The other great thing about paperwhites is that they can grow in our gardens in Columbia. After you have enjoyed them inside for the holidays, you can put them into your garden and enjoy them for years to come. Just add a little compost and a little bone meal to the soil when you plant them. (Note: this will not work if you use only water to force your bulbs indoors. They must be grown in potting soil).
Making Them Last
As you grow amaryllis and paperwhites indoors, keeping them cooler and away from direct sunlight will keep the blooms lasting longer. High sun or warm temperatures may cause the stems to get very long. This, along with the heavy flowers, can cause the stem to fall over. If this happens, cut the stem at its base and put the flower in a vase. These make long lasting cut flowers too.
Floppy Stems?
One fun study at Cornell University has resulted in a way to keep your paperwhite and amaryllis stems from flopping over. And it involves alcohol! Gin, vodka or tequila works well. Do not use beer or wine, as they contain too much sugar. Mix one-part alcohol to seven parts water and use this mixture for your weekly bulb watering. It keeps the stems about one third shorter and does not affect the blooms. Do not make it stronger – too much is toxic, but we knew that didn’t we? Isopropyl (Rubbing) alcohol will also work the same way as liquor.
Best wishes for a love-filled holiday season,
Linda